
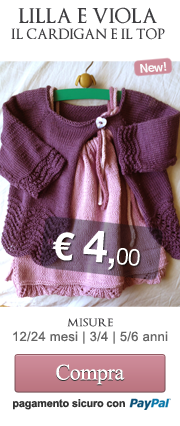
 Ho trovato interessante questo modello per il bordo, imparate a farlo e potrete aggiungerlo ad un cardigan , un vestitino o, perchè no, ad una copertina.
Ho chiesto il permesso a Cristal palace per la traduzione e la pubblicazione, ecco la risposta:
|
Hi,
Nice job!
Bravo.
Yes, please go aheaad and publish.
susan
Susan C. Druding
Crystal Palace Yarns
http://www.straw.co(
(ehi bel lavoro, bravo, vai avanti e pubblica)
Devo dire che in genere sono tutti contenti di vedersi pubblicare i loro modelli, soprattutto gli americani che hanno il senso degli affari, infatti è tutta pubblicità gratis!
Crystal Palace Yarns
MISURE 6/9 – 12 – 18 mesi
2 anni
Filato Crystal Palace bunny hop da 2 a 4 gomitoli colore naturale 204
1/2 gom col rosewater n 2301
ferri 4-4,5( diritti e circolari)
segnapunti
campione 21 m x 28 ferri= 10 cm ferri 4 a coste
tecniche
accavallata-passare 1 m senza lav, lav la successiva, accavallare la prima sulla seconda( abbiamo diminuito 1 m)
accavallata doppia-passare 1 m senza la, lav le 2 successive assieme, acc la prima su queste due( abbiamo diminuito 2 m)
punti
bordo punto fantasia ( descritto nella spiegazione del modello)
punto coste 1/3-1 dir/ 3 rov
DIETRO
Con i ferri diritti 4,5 e il col naturale,montare 185m(199-214-228) e lavorare il volant in questo modo:
fare 2 ferri diritti ,poi cambiare con il col rosa
f3-3 rov,”11 dir,3 rov,” ripetere per tutto il ferro
f4-3 dir,”11 rov,3 dir” rip
f5-3 rov,” 1 acc,2 dir,1 gett,1 doppia accavallata, i gett,2 dir,2 ass al dir,3 rov, rip
f6-3 dir,”9 rov,3 dir,” rip
f7-3 rov,” 1 acc,1dir,1 gett,1 doppia acc,1 gett,1 dir,2 ass al dir,3 rov”rip
f8-3 dir,”7 rov,3 dir,”rip
f9-3 rov,”1 acc,1 gett,1 doppia acc,1 grett,2 ass al dir,3 rov” rip
f10-3 dir,”5 rov,3 dir,”rip
f11-3 rov,”1 acc,1 dir,2 ass al dir,3 rov”rip
f12-3 dir,”3 rov,3 dir”rip
f13-3 rov,” 1 doppia acc,3 rov”rip
f14-3 dir,”1 rov,3 dir”rip
cambiare con il col rosa.
f15-3 rov,”1 dir,3 rov”rip
f16-3 dir”1 rov,3 dir” rip
Abbiamo finito la lavorazione del volant, con il colore naturale continuiamo a lavorare sulle 55 m( 59-63-67) per il corpo e impostare la lavorazione a coste 1/ 3 e per farlo ripetiamo sempre i ferri 15 e 16, fino a che il lavoro misura 15 cm( 16,5-17,5-20) dal ferro di montaggio.
mettere un segno ai lati ( dovre andranno attaccate le maniche)
lavorare 10 cm( 11,5-12,5-14) oltre i segni poi fare un ferro a rovescio
DIMINUZIONI PER LO SCOLLO E LE SPALLE
Lavorando i due lati contemporaneamente fare 16m( 16-18-19) seguendo il modello e , con un altro gomitolo, chiudere le 23 m( 27-27-29) centrali per lo scollo, lavorare le rimanenti maglie seguendo il modello.
Diminuire 1 m dalla parte dello scollo ad ogni ferro per 2 volte( 2-3-3)= resteranno 14m( 14-15-16)
lavorare ancora 1 ferro
Chiudere le 14 m ( 14-15-16) della spalla con mano lenta.
DAVANTI
lavorare come fatto per il dietro fino a 5 cm( 5-5-6,5) sopra i segni e iniziare le dim per lo scollo.
DIMINUZIONI PER LO SCOLLO
Lavorare i 2 lati allo stesso tempo
Lavorare 24 m ( 24-26-28) secondo il modello,con un secondo gomitolo e chiudere 11 m ( 11-11), lav le rim 24m( 24-26-28) seguendo il modello.
Diminuire 1 m dalla parte dello scollo ad ogni ferro per 5 volte( 5-5-6), resteranno 14 m(14-15-16).
Lavorare finchè lo scalfo raggiungerà la stessa altezza di quello dietro.
MANICHE
Con i ferri 4 e il colore naturale,montare 101 m ( 115-129-129)
Fare i 16 ferri del volant come fatto per il dietro/davanti, resteranno 31m( 35-39-39)
Ripetere i ferri 15 e 16, fare 2 ferri, dopo di che iniziare a fare gli aumenti ai lati:
aumentare 1 m ( all’interno di 2 m) a tutti i ferri per 2 volte( 6-0-0), ancora sempre a tutti i ferri per 4 volte(4-3-9-8).
Ogni 6 ferri per 0 volte( 0-0-3): resteranno alla fine delle dim, 45m( 55-59-63).
Continuare a lavorare fino a 15 cm( 17,5-21,5-26,5) dal ferro di montaggio.
Dopo aver lavorato un ferro a rovescio,mettere un segno sulla m centrale e chiudere con mano lenta seguendo il modello.
FINITURE
Le istruzioni dicono di fare il “bloccaggio”, vuol dire stendere le parti su un piano in cui si possano infilare degli spilli di acciaio, si inumidisce leggermente il pezzo con uno spruzzino, si fissa al piano mantenendo le misure indicate e si lascia asciugare, poi si stira con il ferro a vapore e si cuciono le parti( in questo caso non fare il bloccaggio sui volant).( Nota della traduttrice: io stiro semplicemente i vari pezzi con il ferro a vapo senza tirarli e aspetto che siano asciutti prima di cucirli)
Cucire le spalle, fare il bordo dello scollo,cucire le maniche, facendo combaciare il centro della spalla con quello della manica
Bordo dello scollo
Con i f circolari, al diritto del lavoro e iniziando dalla spalla sinistra riprendere 66m( 68-68-74)m attorno allo scollo
mettere un segno e lavorare in tondo:
giro 1-al dir
giro 2-rov
giro 3-5 con il colore rosa al diritto
cambiare con il col naturale e fare il giro 6 al diritto.
Chiudere con mano lenta al rovescio( per chi non usa i f circolari,attaccare solo una manica e cucire quindi solo una spalla e prima di chiudere la seconda spalla, riprendere 66m( 78-78-84) attorno allo scollo, al diritto del lavoro, e fare 2 ferri a legaccio, poi 4 a m rasata al 5° chiudere;cucire la seconda spalla e attaccare la manica.
free knit baby sweater pattern
|
Below is a close-up |
|
|


 Bunny Hop Baby Ruffled Pullover
Designed and Knit by Dawn Leeseman for Crystal Palace Yarns
Bunny Hop is a luscious yarn from Crystal Palace Yarns combining microfibers and bunny angora. Click the yarn name just below to see the complete color card.
Sizes: 6-9 (12) (18) months (2 yrs)
Finished garment at chest: 21 (22.5) (24) (25.5)”
[For a bigger girl’s version of this pattern for ages 4-10 – click here.]
Materials:
Crystal Palace Bunny Hop: 2 (3) (3) (4) – 50 gram balls, (MC) and 1 (2) (2) (2)- 50 gram ball (CC)
[Photos show MC = #204, “natural” and CC = #2301, “rosewater”
Needles: Crystal Palace Bamboo Needles US size 6 – 16” circular and size 7 circular or straight.
Locking or split ring markers
Gauge: 21 sts and 28 rows = 4″ on Size 7 needles in Rib Stitch, slightly stretched and blocked, be sure to do a gauge swatch.
Abbreviations: BO-bind off; CC-contrast color; CO-cast on; Dec-decrease; Inc-increase; k-knit; MC-main color; meas-measures; patt-pattern; p-purl; rep-repeat; RS-right side; SKP-slip, knit pass slip st over; SK2p-slip1 stitch, k2 stitches together, pass slip st over; sl-slip; tbl-through back loop; tog-together; WS-wrong side; yo-yarn over.
Back
Using Size 7 needles and MC, CO 185 (199) (213) (227) work Ruffle Trim as follows:
Row 1: Knit.
Row 2: Knit.
Change to CC
Row 3 (RS): P3, *k11, p3; rep from * to end.
Row 4: K3, *p11, k3; rep from * to end.
Row 5: P3, *SKP, k2, yo, SK2P, yo, k2, k2tog, p3; rep from * to end.
Row 6: K3, *p9, k3; rep from * to end.
Row 7: P3, *SKP, k1, yo, SK2P, yo, k1, k2tog, p3; rep from * to end.
Row 8: K3, *p7, k3; rep from * to end.
Row 9: P3, *SKP, yo, SK2P, yo, k2tog, p3; rep from * to end.
Row 10: K3, *p5, k3; rep from * to end.
Row 11: P3, *SKP, k1, k2tog, p3; rep from* to end.
Row 12: K3, *p3, k3; rep from * to end.
Row 13: P3, *SK2P, p3; rep from * to end.
Row 14: K3, *p1, k3; rep from * to end.
Change to MC
Row 15: P3, *k1, p3; rep from * to end.
Row 16: K3, *p1, k3; rep from * to end.
Using MC working on rem 55 (59) (63) (67) sts; rep rows 15 and 16 until piece meas 6 (6.5) (7) (8)”; from CO edge.
Place marker at each end. Work 4 (4.5) (5) (5.5)” above marker; end after working WS row.
Neck and Shoulder Shaping
Work both sides at the same time. Work 16 (16) (18) (19) sts, in patt; with second ball of yarn, BO 23 (27) (27) (29) sts, work rem 16 (16) (18) (19) sts in patt. Dec 1 st at neck edge every row 2 (2) (3) (3) times. 14 (14) (15) (16) sts rem. Work 1 row even. BO 14 (14) (15) (16) shoulder sts loosely, in patt.
Front
Work same as for the back, until 2 (2) (2) (2.5) ” above armhole marker, begin neck shaping.
Shape Neck:
Work both sides at same time. Work 24 (24) (26) (28) sts, in patt; join 2nd ball of yarn and BO 7 (11) (11) (11), work rem 24 (24) (26) (28) sts, in patt.
Dec 1 sts at neck edge every row, 5 (5) (5) (6) times; then dec 1 st at neck edge every other row 5 (5) (6) (6) times; 14 (14) (15) (16) sts rem. Work even until armhole meas same as back.
Sleeves
Using Size 7 needles and MC, CO 101(115) (129) (129). Work Rows 1-16 of Ruffle Trim, same as for Back and Front. 31 (35) (39) (39) sts. Rep rows 15 and 16; work 2 rows. Inc Row: Increase 1 st at each end; rep Inc row every other row, 2 (6) (0) (0) times and every row 4, 4 (3) (9) (8) times; and every 6 rows 0 (0) (0) (3) times. Working all sts into patt as established. 45 (55) (59) (63) sts.
Work even until piece meas 6 (7) (8.5) (10.5)” from CO edge; end after working WS row. Place stitch marker at center stitch. BO loosely in pattern.
Finishing
Block pieces, stretching slightly, do not block ruffle. Sew Shoulder Seams. Work Neck trim. Sew sleeves, matching sleeve center stitch marker to shoulder seam. Sew side seams.
Neck Trim
Using size 6 needle and MC, beginning at left shoulder pick up 16 (18) (18) (20) sts along left neck edge; pick up 7 (11) (11) (11) neck BO sts; pick up 16 (18) (18) (20) sts along right neck edge; pick up 2 sts at right back neck; 23 (27) (27) (29) sts back BO sts; pick up 2 along left back neck. 66 (78) (78) (84) sts. Place marker and join into round. Rnd 1: Knit. Rnd 2: Purl. Change to CC. Rnd 3-5: Knit. Change to MC. Rnd 6: Knit. BO loosely in purl.
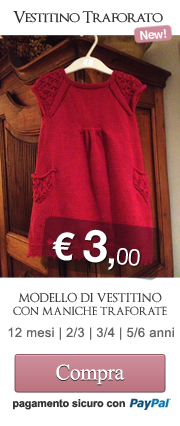
VERSIONE TUNICA
con maniche 3/4
misure-4-6-8-10 anni
circonferenza capo finito-65 cm( 70-75-80)
lunghezza-49 cm( 52,5-56-60)
ferri diritti 4,5.-5
e f circolari
2 segnapunti
campione-20 mx24 f= 10 cm con f 5
da 5 a 8 gomitoli del filato principale e da 2 a 3 gomitoli per i bordi
per la qualità del filato vedetelo nella spiegazione in inglese
DIETRO
Con i ferri 4,5 e il col principale montare 227 m( 241-255-269) e lav il volant in questo modo:
Ferri 1 e 2 al diritto
Cambiare con il col contrastante
f3- 3 rov,” 11 dir,3 rov” ripetere per tutto il ferro
f4- 3 dir” 11 rov,3 dir,” rip
f5- 3 rov,”2 diritti assieme ritorti ,2 dir,1 gett,1 acc doppia,1 gett,2 dir, 2 ass al dir,3 rov” rip= 195m( 207-219-231).
Ferri 6 e 8- 3 dir.”9 rov,3 dir,” rip
f9- 3 rov,” 2 ass ritorti,1 dir,1 gett, 1 doppia acc,1 gett, 1 dir, 2 ass al dir,3 rov” rip= 163 m( 173-183-193).
Ferri 10-12 e 14- 3 dir” 7 rov,3 dir” rip
ferri 11 e 13- 3 rov” 2 dir,1 gett,1 doppia acc,1 gett,2 di,3 rov”rip
f 15- 3 rov” 2 dir ass ritorti,1 gett,1 doppia acc,1 gett,2 ass al dir,3 rov”rip= 131 m( 139-147-155)
Ferri 16-18 e 20-3 dir” 5 rov,3 dir” rip
ferri 17 e 19- 3 rov” 1 dir, 1 gett,1 doppia acc, 1 gett, 1 dir,3 rov” rip
f21- 3 rov,” 1 dir,1 doppia acc, 1 dir,3 rov” rip
f22-3 dir” 3 rov,3 dir” rip
f23-3 rov,” 1 doppia acc,3 rov” rip= 67 m( 71-75-79).
f24-3 dir” 1 rov,3 dir” rip
Cambiare con i ferri 5 e il colore naturale e lavorare 1 ferro al diritto.
COSTE 3/1
f1( al rovescio)-3 dir” 1 rov,3 dir” rip
f2-3 rov,” 1 dir,3 rov” rip
Ripetere sempre questi 2 ferri.
Continuando con il colore naturale(Nota della traduttrice:nel testo è contrassegnato con MC, che sta per “main color, cioè colore principale mentre il rosa è contrassegnato con CC, colore contrastante) e a coste 3/1 lavorare fino a 35 cm( 37,5-40-42,5) dal ferro di montaggio e dopo aver lavorato un f rovescio.
DIMINUZIONI PER LO SCALFO
Chiudere 4 m( 4-4-5) ai lati poi, dim ancora 1 m ad ogni ferro per 3 volte= 51 m( 59-61)
lavorare sempre a coste fino a che gli scalfi misurano 12,5 cm( 14-15-16,5) e finire con un ferro rovescio.
DIMINUZIONI PER LO SCOLLO E LE SPALLE
Lavorare i due lati contemporaneamente:lav le prime 14 m( 15-15-16) seguendo il modello; con un secondo gomitolo, chiudere le 23 m centrali( 27-29-29) poi le rimanenti 14m( 15-15-16).
Diminuire 1m allo scollo ad ogni ferro per 2 volte= 12m( 13-13-14) restanti.
Lavorare fino a 14 cm( 15-16,5-19)
Chiudere tutte le m con m morbida.
DAVANTI
Lavorare come fatto per il dietro, fino a 7 cm( 7-7,5-7,5) oltre lo scalfo, poi chiudere le 51 m rimaste( 57-59-61)
DIMINUZIONI PER LO SCOLLO
Lavorare i 2 lati contemporaneamente.
Lav le prime 22,( 24-25-25) seguendo il modello, chiudere con un secondo gomitolo le 7 m centrali( 9-9-11) e lav le ultime m
Diminuire 1 m ai lati dello scollo ad ogni ferro per 5 volte( 5-6-5) quindi dim 1 m ad ogni altro ferro per 5 volte( 6-6-6)= 12 m ( 13-13-14) restanti.
lav fino a che lo scalfo misura come il dietro
Chiudere le m della spalla con mano morbida.
MANICHE
Con i ferri circolari 4,5 montare 129 m (129- 143-143) e lav il bordo a volant in questo modo:
ferri 1 e 2 al diritto
f3-( al diritto del lavoro)-3 rov,” 11 dir,3 rov” rip
f4-3 dir” 11 rov,3 dir” rip
f5- 3 rov” 2 ass ritorti,2 dir,1 gett,1 acc doppio,1 gett,2 dir,2 ass al dir,3 rov” rip= 111 m( 111-123-123
ferri 6 e 8- 3 dir,” 9 rov,3 dir” rip
f7-3 rov” 3 dir,1 gett,1 doppia acc,1 gett,3 dir,3 rov,” rip
f9-3 rov” 2 ass rit,1 dir,1 gett,1 doppia acc,1 gett,1 dir,2 ass al dir,3 rov” rip= 93m( 93-103-103)
ferri 10 e 12- 3 dir” 7 rov,3 dir” rip
f11-3 rov,” 2 dir,1 doppia acc,1 gett,2 dir,3 rov” rip
f13-3 rov,” 2 ass rit,1 gett,1 doppia acc,1 gett,2 ass al dir,3 rov” rip= 75 m( 75-83-83)
f14-3 dir” 5 rov,3 dir) rip
f15-3 rov,” 1 dir,1 doppia acc,1 dir,3 rov” rip
f16-3 dir” 3 rov,3 dir” rip
f17-3 rov” 1 doppi acc,3 rov” rip= 39m( 39-43-43)
f18-3 dir” 1 rov,3 dir” rip.
cambiare con i f 5 e il col rosa,e iniziare la lav a coste 3/1 come fatto dietro.
Lavorare ancora 1 ferro
Al f successivo aumentare 1 m ai lati ripetere gli aumenti ogni 4 ferri per 5 volte( 5-4-5) e ogni 6 ferri per 1 volta( 2.3.3)= 53m( 55.59-61).
lav tutti gli aumenti e continuare la lavorazione a coste
Lavorare fino a 20 cm( 22,5-25-27,5) dal ferro di montaggio
terminare dopo aver lav 1 f a rovescio.
DIMINUZIONI PER L’ARROTONDAMENTO DELLA SPALLA
Chiudere 4 mm(4-4-5) all’inizio dei 2 ferri seguenti
Diminuire 1 m ai lati del f seguente e di tutti i successivi ferri per 4 volte( 5-6-5) e ogni 4 ferri per 1 ( 1-1-2)
Chiudere 4 m all’inizio dei successivi 4 ferri= 17 m restanti( 17-19-19).
Chiudere con mano morbida
mettere un segno sulla m centrale
Finiture
“bloccare”( vedi spiegazione nelle finiture del modello del pullover) ma non “bloccare” il bordo a volant
Chiudere le spalle e lavorare il bordo del collo,Cucire le maniche agli scalfi facendo coincidere il centro della manica con il centro della spalla
Cucire i fianchi.
BORDO DELLO SCOLLO
A dirito del lavoro e con i ferri circolari 4,5, e il colore naturale,iniziando dalla spalla sinistra riprendere 70 m( 76-82-849 in modo regolare attorno allo scollo, mettere un segno e lavorare in tondo , fare 1 giro al diritto, cambiare colore e fare 1 giro al rovescio, , 3 giri al diritto, cambiare colore,1 giro al diritto poi chiudere ” loosely”( in modo morbido) al rovescio
Per chi non sa o non vuole usare i ferri circolari( come me ad esempio..) , cucire solo una spalla, riprendere le stesse m dalla spalla aperta tutto attorno fino all’altra parte e lavorare: 2 ferri diritti,4 f a m rasata e chiudere.

ree knit girl’s tunic sweater pattern
|
|


Bunny Hop is a luscious yarn from Crystal Palace Yarns combining microfibers and bunny angora. Click the yarn name just below to see the complete color card.
Bunny Hop
Ruffled Tunic
with 3/4 length Sleeves
Designed and Knit by Dawn Leeseman for Crystal Palace Yarns
Sizes: 4 (6, 8, 10) yrs
Finished chest: 26 (28, 30, 32)�
Finished length: 19 1/2 (21, 22 1/2, 24)�
[For a Baby Girl version of this pattern
– click here.]
Materials:
Crystal Palace Bunny Hop:
MC: 5 (6, 7, 8) 50-gram balls; color #2210
CC: 2 (2, 3, 3) 50-gram balls; color #2308
Needles:
Crystal Palace Bamboo Needles or CPY DAISY Needles US size 7 (4.5 mm);
16� and 35� circular (the longer length is accommodate large number of sts for lower ruffle and is worked back and forth in rows)
& 1 pair Size 8 (5 mm) straight needles
2 split ring markers
Gauge: 20 sts and 24 rows = 4″ on Size 8 needles in 3 X 1 Rib Stitch, slightly stretched and blocked, be sure to work a gauge swatch.
Abbreviations: BO-bind off; CC-contrast color; CO-cast on; Dec-decrease; Inc-increase; k-knit; K2tog- knit 2 stitches together; MC-main color; patt-pattern; p-purl; rep-repeat; rem-remain(ing); RS-right side; SSK-slip 2 sts knit wise one at a time, place back on left needle and knit together though the back loop; SK2P-slip 1 stitch knit wise, k2 stitches together, pass slip st over; st(s)-stitch(es) WS-wrong side; yo-yarn over.
Back
Using Size 7, 35� needles and MC, CO 227 (241, 255, 269) work Ruffle Trim as follows:
Rows 1 and 2: Knit.
Change to CC.
Row 3 (RS): P3, *K11, P3; rep from * to end.
Row 4: K3, *P11, K3; rep from * to end.
Row 5: P3, *SSK, K2, yo, SK2P, yo, K2, K2tog, P3; rep from * to end ―195 (207, 219, 231) sts.
Rows 6 and 8: K3, *P9, K3; rep from * to end.
Row 7: P3 *K3, yo, SK2P, yo, K3, P3; rep from * to end.
Row 9: P3, *SSK, K1, yo, SK2P, yo, K1, K2tog, P3; rep from * to end ―163 (173, 183, 193) sts.
Rows 10, 12 and 14: K3, *P7, K3; rep from * to end.
Rows 11 and 13: P3 *K2, yo, SK2P, yo, K2, P3; rep from * to end.
Row 15: P3, *SSK, yo, SK2P, yo, K2tog, P3; rep from * to end ―131 (139, 147, 155) sts.
Rows 16, 18 and 20: K3, *P5, K3; rep from * to end.
Rows 17 and 19: P3 *K1, yo, SK2P, yo, K1, P3 rep from * to end.
Row 21: P3, *K1, SK2P, K1, P3; rep from* to end ― 99 (105, 111, 117) sts.
Row 22: K3, *P3, K3; rep from * to end.
Row 23: P3, *SK2P, P3; rep from * to end ―67 (71, 75, 79) sts.
Row 24: K3, *P1, K3; rep from * to end.
Change to size 8 needles and MC. Knit 1 row.
3 X 1 Rib
Row 1(WS): K3, *P1, K3; rep from * to end.
Row 2: P3, *K1, P3; rep from * to end.
Repeat rows 1 and 2.
Continuing with MC and 3 X 1 Rib, work until piece measures 14 (15, 16, 17)� from CO edge, end after working WS row.
Armhole Shaping
BO 4 (4, 4, 5) sts in patt at beg of next 2 rows. Dec 1 st at each end of next row and every other row, 3, times ―51 (57, 59, 61) sts. Work even in rib until armhole measures 5 (5 1/2, 6, 6 1/2)�, end after working WS row.
Neck and Shoulder Shaping
Work both sides at the same time. Work 14 (15, 15, 16) sts in patt; with second ball of yarn, BO 23 (27, 29, 29) sts, work rem 14 (15, 15, 16) sts in patt. Dec 1 st at neck edge every row 2 times ―12 (13, 13, 14) sts rem. Work row even if necessary until armhole measures 5 1/2 (6, 6 1/2, 7)�. BO shoulder sts loosely in patt.
Front
Work same as for the back, until 2 1/2 (2 1/2, 3, 3) � above armhole BO ―51 (57, 59, 61) sts.
Shape Neck:
Work both sides at same time. Work 22 (24, 25, 25) sts, in patt; join 2nd ball of yarn and BO 7 (9, 9, 11) sts work rem 22 (24, 25, 25) sts, in patt.
Dec 1 st at neck edge every row, 5 (5, 6, 5) times; then Dec 1 st at neck edge every other row 5 (6, 6, 6 times ―12 (13, 13, 14) sts rem. Work even until armhole measures same as back. BO shoulder sts loosely in patt.
Sleeves
Using Size 7, 35� circular needles and MC, CO 129 (129, 143, 143) sts. Work Ruffle Trim as follows:
Rows 1 and 2: K.
Change to CC.
Row 3 (RS): P3, *K11, P3; rep from * to end.
Row 4: K3, *P11, K3; rep from * to end.
Row 5: P3, *SSK, K2, yo, SK2P, yo, K2, K2tog, P3; rep from * to end ―111 (111, 123, 123) sts.
Rows 6 and 8: K3, *P9, K3; rep from * to end.
Row 7: P3 *K3, yo, SK2P, yo, K3, P3; rep from * to end.
Row 9: P3, *SSK, K1, yo, SK2P, yo, K1, K2tog, P3; rep from * to end ―93 (93, 103, 103) sts.
Rows 10 and 12: K3, *P7, K3; rep from * to end.
Rows 11: P3 *K2, yo, SK2P, yo, K2, P3; rep from * to end.
Row 13: P3, *SSK, yo, SK2P, yo, K2tog, P3; rep from * to end ―75 (75, 83, 83) sts.
Rows 14: K3, *P5, K3; rep from * to end.
Row 15: P3, *K1, SK2P, K1, P3; rep from* to end ―57 (57, 63, 63) sts.
Row 16: K3, *P3, K3; rep from * to end.
Row 17: P3, *SK2P, P3; rep from * to end ―39 (39, 43, 43) sts.
Row 18: K3, *P1, K3; rep from * to end.
Change to size 8 needles and MC.
K 1 row. Cont with MC, begin 3 X 1 rib same as for back. Work 1 row even. Next row Inc 1 st at each end; rep Inc row every 4 rows 5 (5, 4, 5) and every 6 rows 1 (2, 3, 3) times ― 53 (55, 59, 61) sts. Work all inc sts into patt as established. Work even until piece measures 8 (9, 10, 11)� from CO edge; end after working WS row.
Shape Cap
BO 4 (4, 4, 5) sts in patt at beg of next 2 rows. Dec 1 st at each end of next row and every other row 4 (5, 6, 5) times and every 4 rows 1 (1, 1, 2) BO 4 sts at beg of next 4 rows ―17 (17, 19, 19) sts. BO loosely in patt. Mark center stitch using split ring marker.
Finishing
Block pieces, do not block ruffle. Sew shoulder seams. Work neck trim. Sew sleeves into armhole, matching sleeve center stitch marker to shoulder seam, ease cap into armhole as necessary. Sew side seams.
Neck Trim
With RS facing, using size 7, 16� circular needle and MC, beg at left shoulder pick up 16 (16, 18, 18) sts along left neck edge; 7 (9, 9, 11) front neck sts; 16 (16, 18, 18) sts along right neck edge; 4 sts along right back neck; 23 (27, 29, 29) sts back neck sts; and 4 along left back neck ―70 (76, 82, 84) sts. Place marker and join into round.
Rnd 1: K
Rnd 2: P. Change to CC.
Rnd 3-5: K. Change to MC.
Rnd 6: K.
BO loosely in purl.
Pattern Copyright 2008 Crystal Palace Yarns/Straw Into Gold, Inc. – We are happy to share this pattern with knitters. The pattern may be used for non-commercial personal or knitting guild use. It is not to be used in any publication in print nor should it be reproduced in electronic/digital format without permission. Knitting shops carrying CP Yarns Bunny Hop are welcome to print and share this pattern with customers of our yarns.
Retail shops in the USA should contact CPY Wholesale for information on purchasing
Crystal Palace Yarns and email cpyinfo -at- straw.com (replace the -at- with @)
or write to:
Crystal Palace Yarns, 160 23rd St., Richmond, CA 94804
phone: 510-237-9988, fax: 510-237-9809


Ηowdy! I have been following this Ƅlog for some timе and I think it’s well-written. I’m constantly looking forward to ѕeeing a brand-new post.