
 http://plainandjoyfulliving.blogspot.com/2009/02/fun-knitting-gnome.html
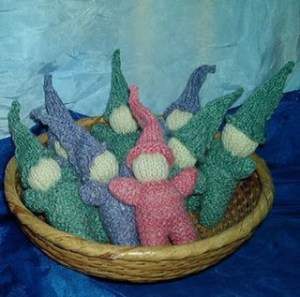
Oggi vi propongo questi piccoli gnomi, da prepararne in quantità e di misure diverse per essere appesi all’albero di Natale, o come giocattolo per i bimbi.
Per variare le misure basta cambiare la grossezza della lana e dei ferri.
La creatrice , si chiama Tonya, vive con la sua famiglia composta da ben 7 figli, nel Vermont, e si mantengono con quello che creano, tra cui questi gnomi.
A quello che ho capito fanno parte di una comunità che crea e vende , c’è un elenco lunghissimo dei loro oggetti.
Scrive Tonya nella presentazione del suo blog, che gli gnomi sono stati la sua prima produzione e per merito loro è entrata nel commercio on-line.
Vi ricordate di quel film con la Diane Keaton:”Baby Boom” mi pare si chiamasse, dove per far crescere la bambina che le era capitata tra capo e collo, va appunto a vivere nel Vermont(almeno credo, c’era molta neve..) e si mette a fare composte di mele e poi diventa ricchissima?
Questo è il sogno americano, quello che ha attirato persone da tutto il mondo.
Mi affascina l’idea di questa famiglia che vive ,suppongo in posti bellissimi tra le montagne, e si mantengono ..facendo..gnomi.
Cosa c’è di più vicino allo spirito del Natale?
These little guys started me in the online ecommerce world and I have decided to share the pattern with all. I would have to guess I have knitted thousands. They make a wonderful pattern for the beginner and can be knitted in various sizes depending on knitting needles and weight of the yarn.
You can use any size needle and yarn to create different size gnome babies!
Cast on 10 stitches, leaving about a 10″ tail for sewing up the leg
Knit 10 rows (garter stitch).
Cut yarn leaving a 5″ tail.
(push first leg to bottom of needles)
Cast on 10 stitches on same needle that first leg is on this time leaving about a 15″ tail.
Like first leg, knit 10 rows (garter stitch).
Now knit both legs together (all 20 stitches). This will form the body.
Knit (garter stitch) for 16 rows
Now switch to the skin color – and knit 10 rows in the stockinette stitch (this is one row garter, one row purl).
After you have finished the 10th row – bind of all 20 stitches.
Sew up the Body:
Start with the shorter piece of yarn on the leg and thread the needle. Fold the leg in half to meet in the middle. (Wrong sides together – the smooth part of the head will be on the inside) Start with a running stitch around the bottom of the leg and pull. Then stitch up the side of the leg.
Finish by making a knot with the other yarn end that is in the middle and tuck yarn ends to the outside.
Now take the longer string at the end of the other leg and thread yarn needle. Work just like the first leg except continue stitching up the back of the gnome baby. When you reach the skin color – tie off with the other colored yarn.
Turn body right side out.
Stuff body with wool. Stuff legs first. I use the end of the knitting needle or crochet hook to get the wool in firmly. Stuff up to the beginning of the head.
Now take the yarn that you used to knit up the back of the body and make a running stitch between the body color and head color to form the neck. Tie a knot.
Now tuck all the loose strings into the head and take the skin color hanging yarn and thread needle. Sew up back of the head only to the top. Cut body color loose string inside head.
Stuff head with wool.
Now use a running stitch around top of head and tie off with other yarn string. Cut hanging yarns almost to the knot.
Arms:
Cast on 8 stitches and knit 8 rows, cast off.
Sew up cast off edge with a running stitch and then sew up side. Stuff Arm . Repeat for Arm 2.
Cast on 22 stitches. Knit four rows in the stockinette stitch (Knit one row, Purl one row) for four rows.
Now, knit two stitches together at the beginning and end of each knit row (every other row).
Continue this until there is only one stitch left. Cut yarn long (about 20″) and pull through loop.
Put yarn in yarn needle and sew up back of hat. Let the bottom of the hat roll up a bit for the brim and finish sewing around head. nd then attach to side of body.
Ho chiesto a Tonya il permesso per la traduzione ed è ben felice di condividere con voi i suoi gnometti
TRADUZIONE
Riassumendo, dice di usare la lana che si preferisce con i ferri adeguati, e qualcosa per imbottire( mi pare che suggerisca della lana cardata, quella per imbottire i materassi per intenderci,ma..insomma, qualcosa troverete.
PRIMA GAMBA
Montare 10m lasciando il filo lungo 25 cm per la cucitura.
lav 10 ferri a legaccio
tagliare il filo lasciandolo lungo 12,5 cm
SECONDA GAMBA
spingere la prima in fondo al ferro e sullo stesso ferro
montare 10 m e lav 10 f a legaccio, lasciare il filo lungo 40 cm circa
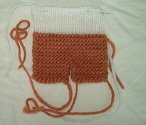
CORPO
Ora lav le 2 gambe assieme(20m), per formare il corpo.
Lav 16 ferri a legaccio.
TESTA
Ora passare al color pelle,e lav 10 f a m rasata, poi chiudere.
CUCITURE
Iniziare con la parte di filo più corta della gamba, infilare il filo in un ago, piegare le gambe(nel senso della lunghezza) verso il dietro ad incontrarsi al centro i lati rovesci assieme,fare le cuciture, poi rovesciare il tutto al diritto spingendo fuori la testa e le gambe
.Terminate facendo un nodo con l’altra parte del filo che si trova nel mezzo e ripiegate i fili verso l’esterno.
Ora infilate l’ago nel filo piu’ lungo dell’altra gamba. Lavorate esattamente come la prima gamba ma questa volta continuate a cucire lungo la schiena dello gnomo. Quando arrivate al filato color pelle legatelo all’altro filato colorato.
Rovesciate il corpo al diritto e riempitelo con l’imbottitura cominciando prima con le gambe e poi su fino alla testa. Si puo’ usare la parte senza punta del ferro o un uncinetto per distribuire meglio l’imbottitura.
Con il filato utilizzato per cucire la schiena unite la testa al corpo formando cosi’ il collo. Fate un nodo.
Spingete tutti i fili che escono dalla testa al suo interno e infilate il filo color pelle nell’ago. Cucite il retro della testa quasi fino alla fine e infilate tutti i fili colorati al suo interno. Riempitela con dell’altra imbottitura e cucite chiudendola del tutto in alto. Tagliate i fili penzolanti il piu’ possibile vicino al nodo.
BRACCIA
Montare 8 m e lavorare 8 ferri al diritto, poi chiudere.
Cucire ,imbottire e attaccare, farne un’altra.
BERRETTO
Montare 22m e lavorare 4 ferri a m rasata, poi lav 2 m assieme ai lati di ogni ferro diritto,fino a che resterà solo una m,tagliare il filo lasciandolo lungo 50 cm e passarlo nella m rimasta con l’aiuto di un ago,fare la cucitura dietro,lasciare che il berretto si arrotoli un poco al bordo,e con il filo della cucitura, attaccarlo alla testa.
Non sono molto soddisfatta della traduzione, soprattutto della parte delle cuciture, non so cucire in italiano, figurarsi in inglese..!
Anzi,questa volta ho chiesto aiuto ad un’amica-di-ferri,Sara, italiana ma che vive a Londra , e senz’altro la parte che ha tradotto lei è quella riuscita meglio!
Se qualcuno nota degli errori e soprattutto se sa come correggerli, please, fate un favore alla comunità e..scrivete!!


Way cool! Some very valid points! I appreciate you writing this article and
the rest of the site is also really good.
Hi there, I discovered your web site via Google while searching for
a similar topic, your website came up, it appears good.
I have bookmarked it in my google bookmarks.
Hello there, simply was aware of your weblog thru Google, and found that it is truly informative.
I am going to watch out for brussels. I will appreciate when
you proceed this in future. Many folks will be benefited from
your writing. Cheers!
Hi, i dont know Brussels very well, so i cant write about.
Ciaomarìca
scusa sono di nuovo io:non riesco a capire dove ha trovato Patti il delfino….come vedi sto studiando tutto il tuo blog per recuperare il tempo perso quando non ti conoscevo!
credo mi stia parlando di un modello all’uncinetto che ha trovato da un’altra parte e che essendo in inglese non riesce a capire,ma quello che non riesce a capire mi lascia alquanto perplessa..
patti, ciao sono belli questi gnomi anche io sono appassionata all’uncinetto lavoro gli AMIGURUMI sono la mia passione ne finisco uno e incomincio un’altro non riesco a staccarmi da loro sono bellissimi solo che in questo momento sono un po’ amareggiata perche’ sto lavorando un delfino ho preso una spiegazione in inglese ma l’ho tradotta in italiano ma ci sono alcune parole che pre quanto tempo ho fatto l’uncinetto non mi sono mai capitate mi potresti dare tu un consiglio non so se a te sono mai capitate.Cos’e’ 1 dicembre e 2° Semestre altrimenti non posso procedere con il lavoro.Spero tanto di potermi aiutare grazie!!!!!!!!!!!!!!
fammi capire:vuoi sapere cosa vuol dire 1°dicembre e 2°semestre..?!
…..scusa volevo scrivere,formando cosi il collo !
ciao
ciao ,
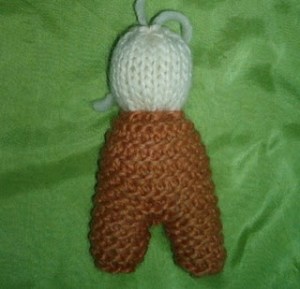
ho provato a fare lo gnomo e ti ringrazio per la spiegazione ma vorrei chiederti;la testa la devo fare staccata e la cucio poi dopo ho e’ la continuazione del corpo .
dalla foto cosi sembra pero nella spiegazione mi dici che la testa si chiude con il filo verde formando cosi il corpo.
potresti aiutarmi …..grazie ciao natascia
sei davvero una bella , persona , ogni tanto vengo a visitare il tuo blog, e trovo sempre idee molto originali e spiegate benissimo !!
grazie mille per quello che fai .
antonella
Davvero graziosi questi piccoli gnomi, peccato che io non so lavorare a maglia… Complimenti per questo bel blog, ricco di idee per chi è appassionato, ma piacevole da vedere anche per i “non addetti ai lavori”. Buona domenica, Annita