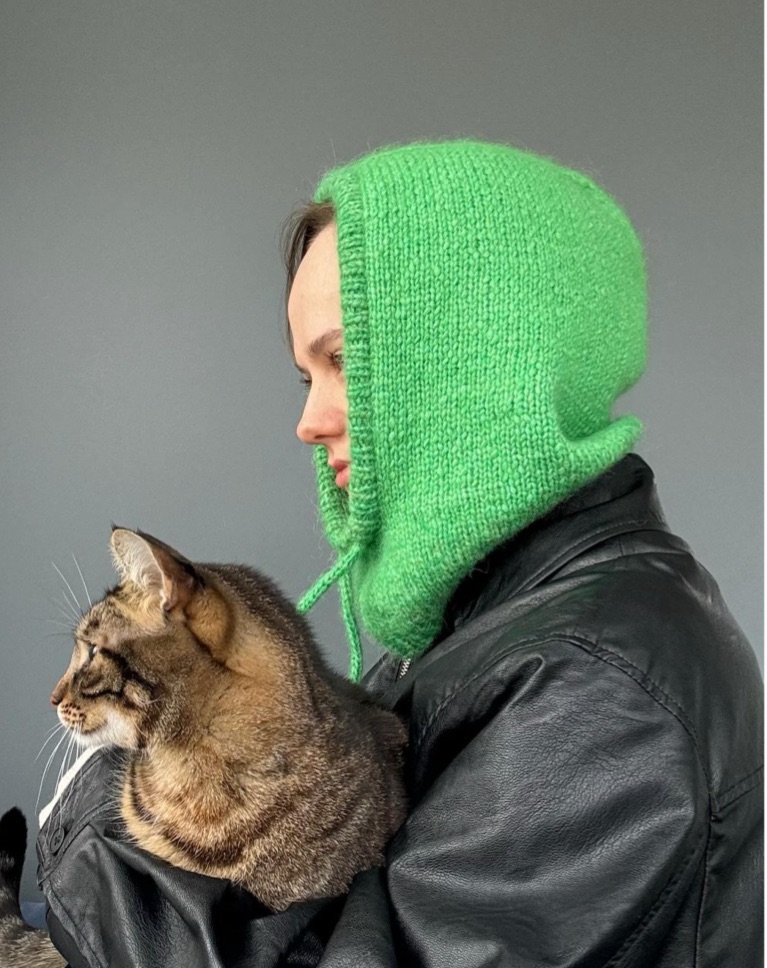

https://www.ravelry.com/patterns/library/vasylyna-hood
MATERIALI
Filato: DROPS Air, 100 g (2 gomitoli)
Ferri: 5 mm circolari (40–50 cm), 5 mm circolari (60–80 cm) o ferri dritti, 3.5 mm circolari (40–50 cm) per la coste, 3 mm per l’i-cord, marcatori , ago da lana.
Il cappuccio è lavorato dall’alto verso il basso in maglia rasata, piatto (in avanti e indietro), poi unito e lavorato in tondo.
Le maglie del bordo sono lavorate in motivo per tutto il tempo (diritto sul lato dritto, rovescio sul lato rovescio).
INIZIO
Utilizzando ferri da 5 mm (circolari da 60–80 cm o dritti), avviare 13 maglie.
Lavorare a maglia rasata in piano fino a un’altezza di 16 cm (42 ferri nel mio campione).
Tagliare il filo.
Con un nuovo filo, al dritto del lav , riprendere 33 maglie lungo un lato lungo del rettangolo (riprendere 3 m ogni 4 ferri) poi
lavoriamo le 13 m in attesa in questo modo:
lavorare la prima m , mettere un marcatore, lavorare 11 maglie, mettere un marcatore, lavorare l’ultima maglia.
Riprendere 33 maglie lungo l’altro lato lungo del rettangolo, riprendendo 3 m per ogni 4 ferri.
Ora avete 79 maglie sui ferri.
Lavorare un F rov su tutte le m .
Ripetere i seguenti 2 ferri 5 volte:
al dir del lav : Lavorare diritto fino al primo marcatore, fare 1 aumento (M1R), passare il marcatore, lavorare a diritto fino al secondo marcatore, passarlo , fare 1 aumento (M1L) e finire il ferro.
rovescio del lav : Lavorare tutte le maglie a rovescio
Dopo gli aumenti, avrete 89 maglie.
Continuare a lavorare in piano a maglia rasata senza aumenti fino a 27–28 cm dall’alto del cappuccio, terminando con un ferro al diritto.
Nel mio campione, questo era 66 ferri dal bordo di avvio.
(Potete aggiungere o togliere alcuni ferri qui a seconda della dimensione desiderata dell’apertura del viso.)
Unione in tondo:
Montare 11 maglie sul ferro di lavoro e unire le punte per lavorare in tondo.
Lavorare a maglia rasata in tondo fino a quando il cappuccio misura 36–37 cm in totale in altezza.
Passare a ferri da 3.5 mm, lavorare 5 giri a coste 1/1 e chiudere le maglie morbidamente utilizzando un ago.
Bordo a coste dell’apertura del viso:
Utilizzando ferri circolari da 3.5 mm lunghi (40–50 cm), riprendere le maglie intorno all’apertura del viso per la rifinitura a coste.
Lungo i bordi di avvio (superiore e inferiore), riprendere ogni maglia.
Lungo i bordi laterali, riprendere 3 maglie ogni 4 ferri.
Dovreste avere circa 118 maglie.
Lavorare a coste 1/1 per 10 giri.
Piegare la coste all’interno e lavorare l’ultimo giro insieme alle corrispondenti maglie del bordo di avvio dal lato rovescio, creando un orlo piegato.
I-cord:
Utilizzando ferri a d punte o circ da 3 mm, lavorare un i-cord di 3 maglie per una lunghezza di 85 cm.
Dopo aver bloccato il cappuccio e il cordone, infilare il cordone attraverso la coste alla base del cappuccio utilizzando una spilla da balia , spaziando le aperture 4–5 cm.
vasylynahood by sonya.needlehand
Yarn: DROPS Air, 100 g (2 skeins)
Needles: 5 mm circular needles (40–50 cm), 5 mm circular needles
(60–80 cm) or straight needles, 3.5 mm circular needles (40–50 cm) for
ribbing, 3 mm needles for the i-cord, stitch markers, tapestry needle.
The hood is worked top down in stockinette stitch, flat (back and forth),
then joined and worked in the round. Edge stitches are worked in
pattern throughout (knit on the right side, purl on the wrong side).
BEGINNING
Using 5 mm needles (60–80 cm or straight), cast on 13 stitches. Work
stockinette stitch flat to a height of 16 cm (42 rows in my sample). Cut
the yarn. With a new yarn, from the right side, pick up 33 stitches along
one long side of the rectangle (pick up 3 sts for every 4 rows). Knit 1 stitch from the live edge of the
rectangle, place a marker, knit 11 stitches, place a marker, knit the last stitch. Pick up 33 stitches along the
other long side of the rectangle, again picking up 3 sts for every 4 rows.
You now have 79 stitches on the needles. Work one wrong-side row, purling all stitches.
Shaping: Repeat the following 2 rows 5 times:
Right side: Knit to the first marker, make 1 increase (M1R), slip marker, knit to the second marker, slip
marker, make 1 increase (M1L)
Wrong side: Purl all stitches
After the increases, you have 89 stitches. Continue working flat in stockinette stitch without increases until
the fabric measures 27–28 cm from the top of the hood, ending with a right-side row. In my sample, this
was 66 rows from the cast-on edge. (You can add or remove a few rows here depending on the desired
size of the face opening.)
Joining in the round: Pick up 11 stitches onto the working needle and join to work in the round. Work
stockinette stitch in the round until the hood measures 36–37 cm in total height. Switch to 3.5 mm
needles, work 5 rounds of 1×1 rib, and bind off loosely using a needle.
Face opening ribbing: Using 3.5 mm circular needles (40–50 cm),
pick up stitches around the face opening for the ribbed edging. Along
the cast-on edges (top and bottom), pick up approximately every stitch.
Along the side edges, pick up 3 stitches for every 4 rows. You should
have approximately 118 stitches. Work 1×1 rib firmly for 10 rounds.
Fold the ribbing to the inside and knit the last round together with the
corresponding cast-on edge stitches from the wrong side, creating a
folded hem.
I-cord
Using 3 mm needles, work a tight 3-stitch i-cord to a length of 85 cm.
After blocking the hood and cord, thread the cord through the ribbing at
the base of the hood using a safety pin, spacing the openings 4–5 cm
apart.
#vasylynahood by sonya.needlehand


Lascia un commento