
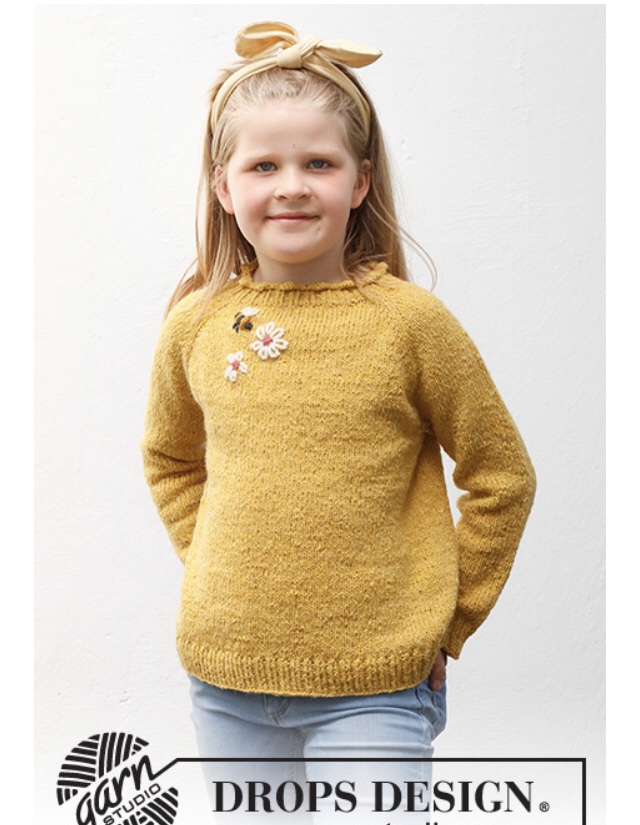
Vedrete basta poco a rendere primaverile e prezioso un capo semplice come un normale pullover o un vestitino

Questo ad esempio, pullover topdown con ricami
Trovate la spiegazione in italiano qui:
https://www.garnstudio.com/pattern.php?id=10451&cid=4
Come fare i ricami sulla lana :
https://www.garnstudio.com/video.php?id=203&lang=it


Di questo non ho trovato la spiegazione

Di Filcolana
Design: Rachel Søgaard (knitting) & Karen Marie Dehn (embroidery)
1st English edition – January 2020 © Filcolana A/S English translation: Signe Strømgaard
Materiale
150 (150) 150 (200) 250 g Arwetta Classic by Filco- lana in colour 334 (Light Blush)
50 (75) 75 (75) 100 g Paia by Filcolana in colour 709 (Rose Shimmer)
Ferri 3 mm e 4 mm a doppie punte 3 mm e 4 mm circolari lunghi , 60 cm markers
Materials for embroidery
Soluvlies (water soluble stabiliser)
Embroidery needle size 24 with a sharp point
Textile spay adhesive
Filato :
Anina by Filcolana in colour 826 (Cantaloupe me- lange)
Pernilla by Filcolana in colour 819 (Raindrop melange) Tilia by Filcolana in colour 335 (Peach Blossom)
DMC Mouliné in colours: 352 (melon), 754 (light sal- mon), 782 (mustard), 3726 (reddish purple) og 3817 (mint)
TAGLIE
4 anni /104 cl (6 anni /116 cl) 8 anni /128 cl (10 anni /140 cl) 12 anni /152 cl
MISURE
Circonferenza del busto : 54-62 (60-68) 64-72 (68-76) 72-82 cm Circonferenza del capo finito , busto : 66 (73) 78 (82) 87 cm
Lunghezza maniche : 30 (33) 36 (39) 42 cm
Lunghezza totale : 33 (36) 39 (43) 47 cm
Campione
23 m e 32 ferri a m rasata con i ferri 4 mm = 10 x 10 cm.
abbreviazioni speciali
Kfb (aumenti ): lav al dir e senza fare cadere la m dal ferro rilavorarla sul dietro al dir ritorto
Pm: piazzare un marker.
Direzione del lavoro
Si lav tutto assieme dall’alto in tondo con aumenti ai raglan e i bordi a coste con un filato e il resto con i due filati assieme
I ricami sono fatti alla fine
SPRONE
Montare 80 (80) 88 (88) 96 m con i due filati e i ferri 3 mm , piazzare un marker all’inizio del giro e lav 10 giri a coste 1/1
Passare ai ferri 4mm e piazzare i marker per indicare dove fare gli aumenti dei raglan :
: Pm,( BOR marker per l’inizio del giro), 8 (6) 6 (6) 6 dir, pm, 32 (34) 38 (38) 42 dir, pm, 8 (6) 6 (6) 6 dir, pm, lav dir fino a 3 m dal BOR marker.
G A: * Kfb, 3 dir , kfb, dir fino a 3 m dal marker succ, rip da * a * altre 3 volte .
G B: dir fino a 3 m dal BOR marker.
Rip i giri A e B per un totale di 17 (20) 21 (23) 24 volte. 216 (240) 256 (272) 288 m
SEPARAZIONE DELLE MANICHE .
: 3 dir, rimuovere il marker, mettere in attesa le succ 42 (46) 48 (52) 54 m della manica , montare 5 m sul f di destra con il montaggio a cappio , mettere un marker, montare altre 5 m, lav le succ (66) 74 (80)
84 (90) m fino al marker , mettere in attesa le succ 42 (46) 48 (52) 54 m della seconda manica, montare sul f di destra con il montaggio a cappio 5 m, mettere un marker, montare altre 5 m e finire il giro.
CORPO
Lav le 152 (168) 180 (188) 200 m del corpo in tondo a m rasata fino a 19 (20) 22 (25) 28 cm dalla separazione delle maniche .
Passare ai ferri 3 mm tagliare uno dei due filo e lav un giro,dir poi lav 9 giri a coste 1.1 e chiudere lavorando a coste
MANICHE
Rimettere sui ferri 4 le m di una manica e riprendere le m dal sottomanica : 52 (56) 58 (62) 64 m
Lav 9 giri a m rasata e nell’ultimo g dim una m 3 m prima e dopo il marker ).
2 ass, 2 dir, passare il marker 2 dir,1 accavallata .
Rip le dim ogni 10 giri per un tot di 6 (8) 9 (9) 10 volte : 40 (40) 40 (44) 44 m
Cont a lav fino a 28 (31) 34 (37) 40 cm dalla separazione e con i ferri 3 e un filo lav a coste 1/1 per 9 giri
Chiudere lavorando a coste
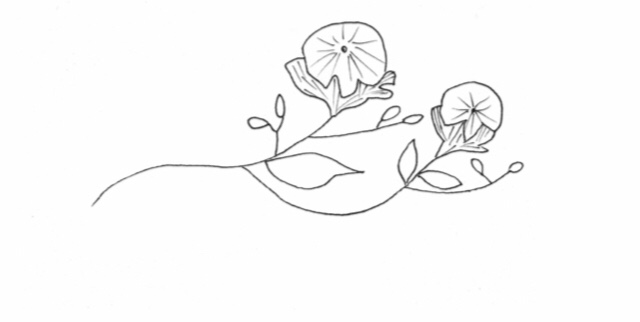
Ricami
Disegna il motivo sulle Soluvlies e spruzza le soluvlies con colla tessile prima di posizionarlo sul WS del maglione. Imbastire lungo le linee di contorno con un singolo filo da ricamo in un colore che sarà chiaramente visibile sulla RS. Non imbastire piccoli dettagli come le gemme e fai attenzione che i punti di imbastitura siano più lunghi sulla RS che sul WS in modo che siano più facili da vedere. Ricama i fiori con il punto raso (Pernilla & Ani- na) – posiziona le maglie come mostrato sul modello, dal centro verso l’altro. Ricama le foglie
Filcolana
Annabella
Page 3
long stitches and 4 strands of DMC Mouliné. Decorate with single straight stitches in a different colour along the underside of the leaves with 2 strands of DMC Mouliné.
Embroider the stems and branches with stem stitch and 2 strands of DMC Mouliné. Embroider the lea- ves with short and long stitch and 4 strands of DMC Mouliné. Embroider the little buds in the same colours as the flowers – satin stitch approx. over 1 of the knitting and 3 satin stitch for each bud. Embroider a few straight stitches on one bud to give it a slightly different tone using Tilia. Embroider a French knot
at the centre of each flower using 4 strands of DMC Mouliné.
Remove any visible basting stitches, cut off any excess soluvlies, wash the work gently and rinse thoroughly. Press the work from the WS.
Tip: Tilia can be a bit fiddly when you pull the yarn through the knitted fabric. Take care to straighten the yarn so it doesn’t form knots.
Tip: It can be tricky to see the details of the motif only based on the basting stitches, so use the temp- late in the pattern as a guide as well as the transfer- red motif on the soluvlies. When in doubt, turn the work to the WS to see where the stitches need to be placed.
See how to embroider the stitches (in Danish) on Youtube – Karen Marie Dehn
http://www.filcolana.dk
Filcolana
Free e di Drops il pullover giallo


Lascia un commento