Ida – Vest
No. 2004-202-7491
Hobbii.com – Copyright © 2020 – All rights reserved Page 1
Materiale
5 (5, 6, 6) gom di Rainbow Bamboo fv 13 1 spool Metallic fv 333
Ferri circ lunghi 60 (80, 80, 80) cm da 4 mm
Ferri diritti da 4mm
markers
Filato di scarto o cavi per m in attesa
Filato
Rainbow Bamboo, Hobbii
60% Cotton, 40% Bamboo viscose
/ 50 g = 125 meters
Metallic, Madeira
45% Polyamid, 55% Metallic Polyester/ 1 spole = 1000 meters
Il filato si compera qui:
campione , con un filo di due gom ass:
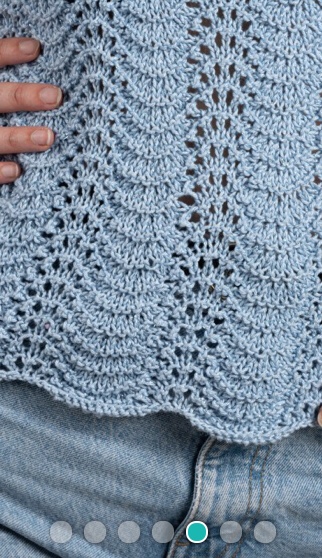
1 rip del motivo a p pavone ( larghezza) 7 cm = 18 m.
25 m e 32 ferri = 10 cm a m rasata
Taglie
S (M, L, XL)
Misure
larghezza : 40 (44, 48, 52) cm lunghezza : 45 (47, 49, 51) cm
Note
Il capo si lavora con i due filati assieme.
Il motivo del p pavone si lavora nella parte centrale del davanti e del dietro, le parti laterali sono lavorate a legaccio.
Si lavora in tondo dal basso fino all’inizio dello scalfo, e il resto si lavora in piano con i ferri diritti
Motivo. Pavone lavorato in tondo:
G 1:dir
G 2:dir
G 3:2 ass per 3 volte,*1 gett,1 dir,per 6 volte,2 ass per 6 volte * rip da * a * fino alle ultime 12 m: (1 gett,1 dir) per 6 volte,2 ass per 3 volte.
G 4: rov
Motivo punto pavone lavorato in piano:
F 1: dir
F 2: rov
F 3:2 ass per 3 volte * (1 gett,1 dir) 6 volte, 2 ass per 6 volte*, rip da * a * fino alle ultime 6 m:2 ass per 3 volte .
F 4: dir
Spiegazione
Corpo
Montare 200 ( 220, 240, 260) m e lav in tondo
Fare un giro rov
Mettere un marker ai lati : = 100 (110, 120, 130) m e ai lati di ogni ripetizione
Un marker sulla m 90 (108, 108, 126) al centro del dietro e del davanti .
G 1: dall’inizio del giro round: 5 rov(1, 6, 2), lav il motivo fino al marker succ , 10 rov (2, 12, 4),lav il motivo fino al succ marker, 5 rov(1, 6, 2).
G 2: 5 dir(1, 6, 2), lav il motivo fino al marker succ, 10 fir(2, 12, 4), lav il motivo fino al marker succ, 5 dir(1, 6, 2).
Continuare in questo modo fino a che il lavoro misurerà 29 cm (30, 31,32), i finendo al quarto giro del motivo .
Davanti
Scalfo
Chiudere 10 (12, 14, 16) m all’inizio del giro , lav il motivo e la parte a legaccio fino al marker del fianco , poi girare il lav e chiudere 10 (12, 14, 16) m = 80 ( 86, 92, 98) m
Cambiare con i ferri diritti e lav il motivo in piano lasciando le m del dietro in attesa ..
Lav 54 (72, 72, 90) m seguendo il motivo e al dir 13 (7, 10, 4) m laterali .
Continuare in questo modo fino a 38 cm (39, 40,41) finendo al quarto giro del motivo.
Lavorare 1 cm e legaccio su tutta la parte.
Scollo
Lav al dir 17 (19, 21, 23)m , chiudere 46 (48, 50, 52) m , dir fino alla fine,
Spalle
Lav a legaccio fino a 45 (47, 49, 51) cm. Chiudere le m
Lav l’altra parte allo stesso modo.
Dietro
Lavorare come il davanti ma proseguire fino a che il lavoro misurerà 42 cm (43, 44,45) finendo al quarto ferro del motivo. Lavorare 1 cm a legaccio su tutte le maglie.
Scollo
Lav 17 dir(19, 21, 23), chiudere 46 (48, 50, 52) m, dir fino alla fine.
Spalle
Lavorare a legaccio fino a 45 (47, 49, 51) cm. Chiudere le m.
Lavorare l’altra spalla allo stesso modo.
Finiture
Cucire le spalle e nascondere i fili..
Hobbii.com – Copyright © 2020 – All rights reserved
Page 4
Originale
Ida – Vest
No. 2004-202-7491
Hobbii.com – Copyright © 2020 – All rights reserved Page 1
Materials
5 (5, 6, 6) skeins of Rainbow Bamboo fv 13 1 spool Metallic fv 333
Circular needle 60 (80, 80, 80) cm/ 4 mm Jumper needles 4 mm
Stitch markers
Stitch holder
Yarn
Rainbow Bamboo, Hobbii
60% Cotton, 40% Bamboo viscose
/ 50 g = 125 meters
Metallic, Madeira
45% Polyamid, 55% Metallic Polyester/ 1 spole = 1000 meters
Buy the yarn here
http://shop.hobbii.com/ida-vest
Gauge, with one strand of each yarn
1 pattern repeat (width) 7 cm = 18 m.
25 sts and 32 rows = 10 cm in stockinette.
Sizes
S (M, L, XL)
Measurements
Width: 40 (44, 48, 52) cm Length: 45 (47, 49, 51) cm
Pattern information
Work with one strand of each yarn quality
held as one.
The top is worked with pattern on the middle stitches on the front and back. The side pieces and the shoulders are worked in garter stitch.
The body is worked in the round until the armhole, and the rest is worked flat on jumper needles.
Hashtags for social media posts
#hobbiidesign #hobbiiida
Enjoy!
Hobbii.com – Copyright © 2020 – All rights reserved Page 2
Pattern, worked in the round.
1st round: knit
2nd round: knit
3rd round: k2tog 3 times, * (yo, k1) 6 times, k2tog 6 times *, repeat from * to * until there are 12 sts left, (yo, k1) 6 times, k2tog 3 times.
4th round: purl
Pattern, Working flat on jumper needles
1st row: knit.
2nd row: purl.
3rd row: k2tog 3 times, * (yo, k1) 6 times, k2tog 6 times *, repeat from * to * until there are 6 sts left of pattern, k2tog 3 times
4th row: knit.
Pattern instructions
Body
Cast on 200 ( 220, 240, 260) sts and work in the round. Purl one round.
Mark sideseams and pattern repeats
Place marker at each side seam = 100 (110, 120, 130) sts on each side. Then place a marker around the middle 90 (108, 108, 126) sts on back and front.
1st round: From beginning of round, purl 5 (1, 6, 2), work pattern until next marker, purl 10 (2, 12, 4), work pattern until next marker, purl 5 (1, 6, 2).
2nd round: knit 5 (1, 6, 2), work pattern until next marker, knit 10 (2, 12, 4), work pattern until next marker, knit 5 (1, 6, 2).
Comtinue like so with the pattern and garter stitch at eash side until the work measures 29 (30, 31, 32) cm. End on the 4th round of the pattern.
Front
Armhole
Bind off 10 (12, 14, 16) sts at the beginning of the round. Work pattern and garter stitch until the side seam marker, then turn work and bind off 10 (12, 14, 16) sts = 80 ( 86, 92, 98) sts. Change to jumper needles and work pattern flat, letting the back rest.
NB! Make sure that the pattern matches the gauge specified.
Hobbii.com – Copyright © 2020 – All rights reserved Page 3
Knit 13 ( 7, 10, 4) for the side, work 54 (72, 72, 90) sts in pattern, knit 13 (7, 10, 4) for the side.
Continue like so until the work measures 38 (39, 40, 41) cm. End on the 4th row of the pattern.
Make 1 cm garter stitch over the entire front.
Neckline
Knit 17 (19, 21, 23), bind off 46 (48, 50, 52) sts, knit until end of row.
Shoulder
Work in garter stitch until work measures 45 (47, 49, 51) cm. Bind off.
Make the other shoulder strap in the same manner.
Back
NB Make sure that the pattern matches the gauge specified.
Work like the front, but continue until the work measures 42 (43, 44, 45) cm. End on the 4th row of pattern.
Make 1 cm garter stitch over the entire back.
Neckline
Knit 17 (19, 21, 23), bind off 46 (48, 50, 52) sts, knit until end of row.
Skulder
Work in garter stitch until work measures 45 (47, 49, 51) cm. Bind off.
Make the other shoulder strap in the same manner.
Finishing
Sew up the shoulder seams and weave in all ends.
Hobbii.com – Copyright © 2020 – All rights reserved
Page 4