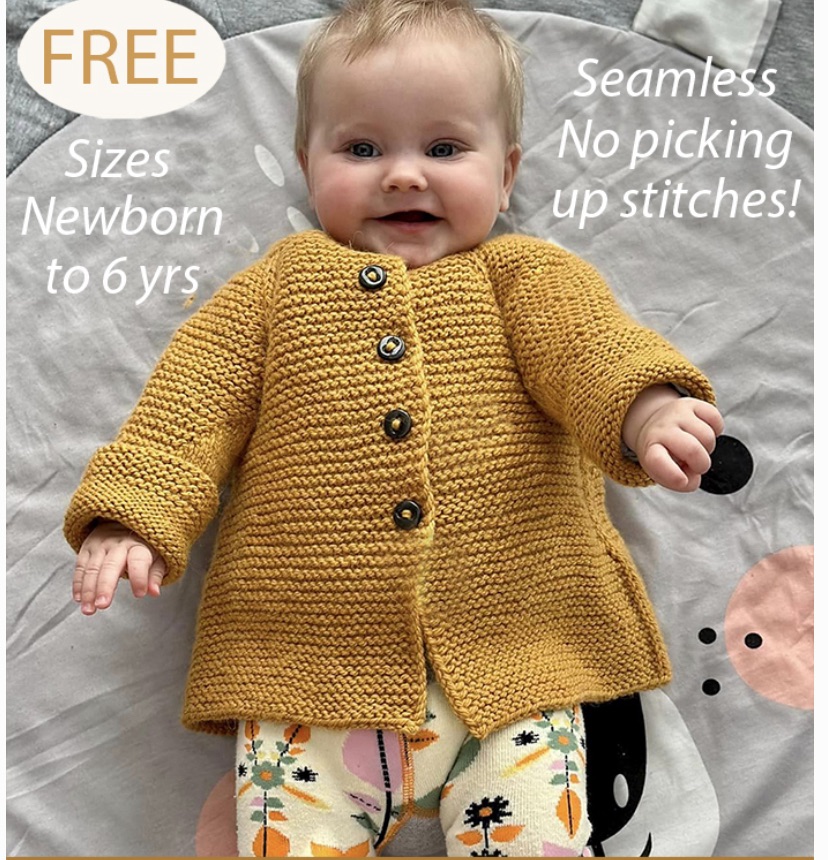
Elliston è il regalo perfetto dell’ultimo minuto per ogni bimbo o bimba. Si lavora dall’alto verso il basso, con bottoni sul davanti.
L’originale ( lo trovate più sotto) lavora le maniche in parte a legaccio e in parte a m rasata, mi è sembrato che complicasse inutilmente il lavoro, per cui vi do una versione tutta a legaccio.
Potete lavorarlo con i ferri dir e le maniche in tondo con qualunque metodo per lav le piccole Circonférenze, oppure potete lavorarle aperte con i ferri dir e poi cucirle; in questo caso aggiungete una m ai lati per la cucitura.
Filato
– Mary Gavans Hoodoo Worsted (Worsted or Aran)
ferri 5.50 mm
campione– 16.0 m = 10 cm
quantità di filato – 225(250,300,350,400,450,500) grammi
taglie – Nascita (3 ,6 ,9-12 , 18-24 mesi,2-3 anni,4-6 anni)
Circonferenza del busto – 40 cm (45-47,5-50-55-60-62,5)
RS: dir del lav
WS rov del lav
KFB: aum lavorando la m due volte: al dir e al dir ritorto
pm: piazzare un marker
sm: spostare il marker sul f di destra
SPIEGAZIONE
Montare 40(45,50,51,56,57,60) m,
Lav 3 ferri diritti ( ferro 1 e 3 sul rov del lav)
F 4: (RS) (dir del lav asola) 2 dir,1 gett,2 ass al dir,dir fino alla fine
Ora mettiamo i marker ( segnapunti ) per di idere le maniche da davanti e dietro e per indicare dove faremo gli aumenti per i raglan:
F 5: (WS) 8(9,10,10,11,11,12) dir ( davanti ), Pm, 6(6,7,7,8,8,8) dir ( manica) Pm, 12(15,16,17,18,19,20) dir ( dietro ), Pm,
6(6,7,7,8,8,8) dir ( manica), Pm, 8(9,10,10,11,11,12) dir ( davanti)
F 6:(RS) (dir fino a 1 m prima del marker succ, ,KFB ( lav la m prima del marker due volte: al dir e al dir ritorto) ,Sm, KFB) anche la m dopo il marker la lav due volte, )rip 4 volte , dir fino alla fine (8 m aumentate )
F 7:(WS) dir.
Lav i ferri 6 e 7, per 4(4,4,4,4,4,4) volte in totale 72(77,82,83,88,89,92) m
F 8:(RS) (asola) 2 dir,1 gett,2 ass, , (dir fino a 1 m prima del marker succ,KFB,sm,KFB) rip per 4 volte dir fino alla fine. (8 m aumentate ).
F 9: dir
Lav i ferri 6 e 7, 4(4,4,4,4,4,4) volte in totale 112(117,122,123,128,129,132) m.
Solo per la taglia nascita – andare al f 10
lav i ferri 8 e 9 (asola),
-(1,1,1,1,1,1) volte in totale _(125,130,131,136,137,140) m
Solo per la taglia 3 mesi – andare al f 10
lav i ferri 6 e 7, -(-,1,2,3,4,4) volte in totale
-(-,138,147,160,169,172) m
Per le taglie 6 , 9-12 , 18-24 mesi, 2-3 anni soltanto – andare al f 10
Lav i ferri 8 e 9 (asola ), solo per l’ultima taglia :180) m
Avrete 9(10,11,12,13,14,15) ferri di aumenti ai raglan : 112(125,138,147,160,169,180) m
SEPARAZIONE DELLE MANICHE
Fate ancora un’asola ogni 10 ferri se volete i bottoni fino in fondo
F 10: (RS) dir fino alle m della manica, eliminare il marker mettere in attesa le succ 24(26,29,31,34,36,38) m della manica,elim il marker, lav il dietro fino al marker succ, eliminarlo, mettere in attesa le 24(26,29,31,34,36,38)m della secinda manica, eliminare il marker, dir fino alla fine. Restano 64(73,80,85,92,97,104) m del corpo.
Proseguire a legaccio sulle m del corpo fino ad altri 12 cm ( 14- 14,5- 17-19-19,5-27,5) finendo con un f sul dir del lav.
Chiudere le m al f succ sul rov del lav lavorando dir.
MANICHE
Potete lav ogni manica separatamente in tondo con i ferri circ corti oppure lunghi e il metodo magic loop o con il set dei 4 ferri a d punte; oppure lavorare contemporaneamente con 2 gomitoli e i ferri diritti
Ricordo che per lav il legaccio in tondo bisogna lav un g dir e un g rov
Se le lav in tondo trasferite su un f le m in attesa di una manica al rov del lav in modo che il prossimo ferro che lavorerete sara al dir del lav, mettere un marker per l’inizio del giro
Lav 5 giri sempre al dir e al quinto giro dim una m prima e dopo il marker
Rip le dim dopo altri 4 giri
Poi llav a legaccio fino a 10 cm ( 11- 12- 14-15-20-22,5) dal sottomanica finendo con un f dispari
G succ rov
G succ dir 4(4,4,4,4,4,4) volte in totale
G succ chiudere le m lavorando rov.
Nascondere i fili chiudere il buchetto sotto le ascelle cucire i bottoni

https://pdf-inline.ravelrycache.com/cashmerejunkie/1504260/Elliston.pdf?
Elliston
n is the perfect last minute go-to gift for every boy or girl.
This is knit top down, with buttons down the front.
The adorable handmade buttons can be found in the Etsy shop: Katrinkles
Page 1
Yarn – Mary Gavans Hoodoo Worsted (Worsted or Aran)
Needle – 9 us (5.50 mm) or what you need to get gauge
Gauge – 16.0 stitches = 4 inches
Yardage – 225(250,300,350,400,450,500)
Sizes – Newborn(3 months,6 months,9-12 months, 18-24 months,2-3 years,4-6 years)
Chest measurements – 15 ½”(18”,19”,20”,22”,24”,25”)
Buttons – 1” size – Several
Cast on 40(45,50,51,56,57,60) stitches, using a long tail cast on
Row 1: (WS) Knit to the end
Row 2: (RS) Knit to the end
Row 3: (WS) Knit to the end
Row 4: (RS) (Buttonhole Row) Knit 2, YO, K2tog, knit to the end
Row 5: (WS) Knit 8(9,10,10,11,11,12)(front), Pm, knit 6(6,7,7,8,8,8)(sleeve), Pm, knit 12(15,16,17,18,19,20)(back), Pm,
knit 6(6,7,7,8,8,8)(sleeve), Pm, knit 8(9,10,10,11,11,12)(front)
Row 6:(RS) (Knit to 1 stitch before the next marker, KFB, Sm, KFB) work 4 times, knit to the end (8 stitches increased)
Row 7:(WS) Knit to the end
Work rows 6 and 7, 4(4,4,4,4,4,4) times total 72(77,82,83,88,89,92) stitches
Row 8:(RS) (Buttonhole Row) Knit 2, YO, K2tog, (Knit to 1 stitch before the next marker, KFB, Sm, KFB) work 4 times, knit
to the end (8 stitches increased)
Row 9:(WS) Knit to the end
Work rows 6 and 7, 4(4,4,4,4,4,4) times total 112(117,122,123,128,129,132) stitches
For sizes Newborn ONLY – Go to row 10
Work rows 8 and 9 (Buttonhole Row),
-(1,1,1,1,1,1) times total -(125,130,131,136,137,140) stitches
For sizes 3 months ONLY – Go to row 10
Work rows 6 and 7, -(-
,1,2,3,4,4) times total -(-
,138,147,160,169,172) stitches
For sizes 6 months, 9-12 months, 18-24 monthes, 2-3 years ONLY – Go to row 10
Work rows 8 and 9 (Buttonhole Row), -(–,1) times total -(-,180) stitches
You will have 9(10,11,12,13,14,15) raglan increases 112(125,138,147,160,169,180) stitches
Divide for the sleeves Work a button hole, every 10th row, if you would like buttons all the way down the front
Row 10: (RS) Knit to the sleeve stitches, Rm, slip the 24(26,29,31,34,36,38) sleeve stitches onto a piece of scrap yarn,
Rm, knit across the back, Rm, slip the sleeve 24(26,29,31,34,36,38) stitches onto a piece of scrap yarn, Rm,
knit to the end 64(73,80,85,92,97,104) stitches
Row 11: (WS) Knit to the end
Row 12: (RS) Knit to the end
Repeat rows 11 and 12 until the body of the sweater measures 4 ½”(5”,5 ½”,6 ½”,7”,9”,11”) inches from the underarm
Row 13: (WS) Bind off knit wise.
Taiga Hilliard Designs ©Taiga Hilliard, All rights reserved. 2022. This pattern is for personal use only. You can print this pattern but cannot
distribute by hardcopy or electronically, for free or for sale. Page 2
Sleeves
Note – Work each sleeve separately, in the round and place a start of round marker 24(26,29,31,34,36,38) stitches
Leave a 6” tail, so you can sew close the hole under each arm
Round 1: Knit 9(10,11,12,13,14,15) stitches, Pm, knit 6(6,7,7,8,8,8), Pm, knit 9(10,11,12,13,14,15)
Round 2: Knit to the marker, Sm, purl to the marker, Sm, knit to the end
Round 3: Knit to the end
Work rounds 2 and 3, 3(3,3,3,4,4,4) times total
Round 4: Knit to the marker, Sm, purl to the marker, Sm, knit to the end
Round 5: Knit 1, K2tog, knit to the last 3 stitches, SSK, knit 1 (2 stitches decreased)
Round 6: Knit to the marker, Sm, purl to the marker, Sm, knit to the end
Round 7: Knit to the end
Work rounds 4 thru 7, 2(2,2,2,2,3,4) times total 20(22,25,27,30,30,30) stitches
Work rounds 2 and 3, until the sleeve measures 3 ¾”(4”,4 ½”,5 ½”,6”,8”,10”)inches, from the under arm, or to desired
length.
Edging Section
Round 6: Purl to the end
Round 7: Knit to the end
Work rounds 6 and 7, 4(4,4,4,4,4,4) times total
Round 8: Bind off purl wise.
Repeat as worked for the 2nd sleeve
Finishing
Weave in your end, sew the buttons on, block and enjoy!
Taiga Hilliard Designs ©Taiga Hilliard, All rights reserved. 2022. This pattern is for personal use only. You can print this pattern but cannot
distribute by hardcopy or electronically, for free or for sale. Page 3
RS – Right side WS – Wrong side YO – Yarn over Sm- Slip marker Pm – Place marker Rm – Remove marker
SSK – Slip, slip, knit together Kfb – Knit into the front and back of the stitch K2tog- Knit two stitches together


