Feeds:
Articoli
Commenti

Archive for the ‘BAMBINE E BAMBINI OLTRE 2 ANNI’ Category

1346-strik-babytroeje-1Lavorazione dal basso . si lavorano dietro e davanti e maniche lasciando tutto in sospeso prima delle diminuzioni dello sprone, si mettono poi le varie parti su un ferro circolare, e ,con delle diminuzioni tra una treccia e l’altra si lavora fino allo scollo.

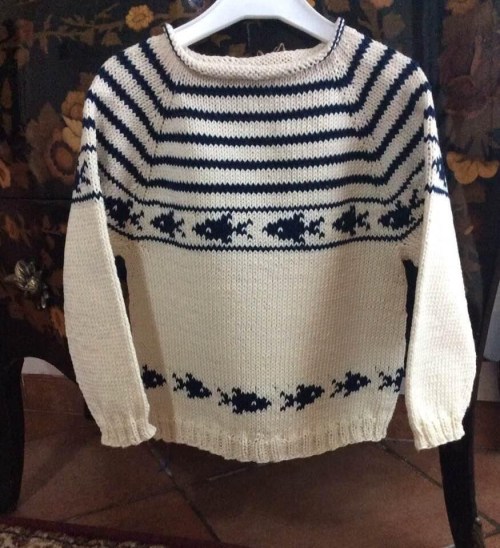
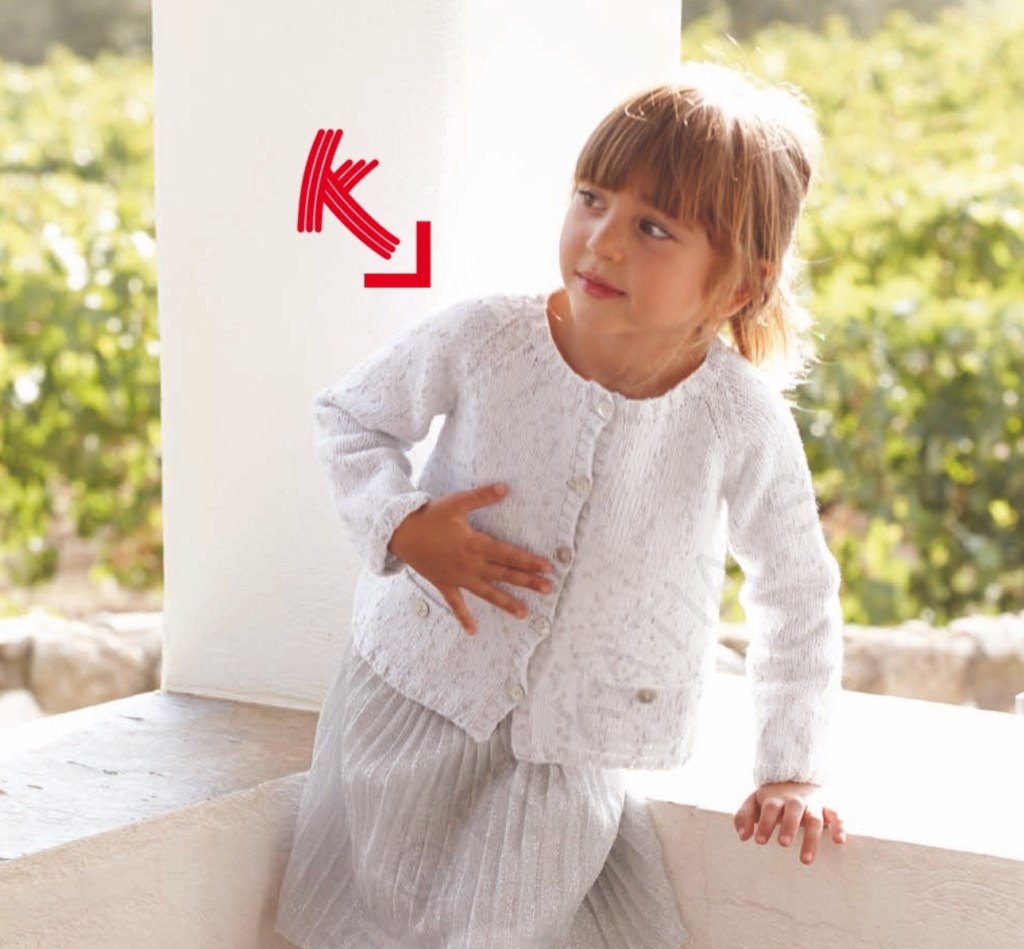
Anche le trecce diventano più piccole  nella parte verso lo scollo.


Convertibile in topdown, per le irriducibili della tecnica(che comprende anche me!) capovolgendo la spiegazione..

cosa occorre: ferri a doppie punte(o circolari corti) da 3.0mm e 4.0mm

un ferro circolare lungo da 4.0mm
un ferretto da trecce
4 ferri o cavi o filo di scarto e ago da lana per mettere in attesa le maglie

La versione originale  qui:HERE. e qui: the pattern on Ravelry. è in danese, ma ne sono state fatte traduzioni in francese e in inglese, e ora ecco la mia in italiano:

TAGLIE
0-3 (3–6) 6–12 (12–18) 18–24 mesi
circonferenza del busto: 47 (50) 58 (61) 68 cm
lunghezza della manica: 12 (12) 12 (18) 21 cm
FILATO
Baby Cashmerino di Debbie Bliss: 2 (2) 3 (3) 4 gomitoli da 50 g, colorway 340608, Dusty Rose 8o un filato merino che si lavora con ferri 4,merino extrafine di Drops ad esempio, io lo compero dal Vignarul, prezzi di spedizione bassi, molta professionalità..ma ce ne sono altri, controllate sempre..
MATERIALE
ferri a doppie punte  e diritti da 3mm   e 4mm
ferro circ  4mm cavo lungo
5 bottoni (12mm di diametro)
ago da lana
CAMPIONE
22 m e  28 ferri con ferri  4.0mm = 10 x 10 cm
la treccia su 9 m  misura 4,5 cm. (C4B, k 1, C4F)
ABBREVIAZIONI
C2B – passare 1m sul ferretto da trecce posto dietro al lavoro,lav al dir la m successiva, poi la m del ferretto.
C2F -passare 1m sul ferretto da trecce posto davanti al lavoro,lav al dir la m successiva, poi la m del ferretto.
C3B – passare 1m sul ferretto da trecce posto dietro al lav,lav al dir la m successiva, poi le due m del ferretto.
C3F -passare 1m sul ferretto da trecce posto davanti al lav,lav al dir la m successiva, poi le due m del ferretto.
C4B – passare 3m sul ferr da tr posto dietro al lav,lav la m succ al dir, poi le 3 m del ferretto
C4F – passare 1m sul ferr da tr posto davanti al lav,lav al dir le 3m succ, poi la m del ferretto
SPIEGAZIONE
DIETRO
Montare  53 (57) 65 (69) 75 m con i ferri 3.0mm .
f 1 (rov del lav): [1 rov,1 dir] rip e finire il ferro con 1 rov.
f 2 (dir del lav): [1 dir,1 rov] rip e finire il ferro con 1 dir.
f 3: come il ferro 1. Cambiare con i ferri 4.0mm .
f 4: 4 rov (6) 4 (6) 3 , [9 dir,3 rov ] rip per 3 volte (3) 4 (4) 5 times,9 dir,4 rov (6) 4 (6) 3.
f 5: lav le m come si presentano
f 6: 4 rov (6) 4 (6) 3,  [C4B, 1 dir, C4F, 3 rov]rip per 4 volte 3 (3) 4 (4) 5 , C4B,1 dir, C4F, 4 rov (6) 4 (6) 3.
f 7: come il ferro 5.
Rip i ferri  4-7. per altre 7 (8) 9 (10) 11 volte. tagliare il filo e mettere le m in attesa.
DAVANTI
Montare 51 (54) 63 (66) 73 m con i ferri  3.0mm .
f 1 (rov del lav): [1 rov,1 dir] ripetere e finire con  1 (0) 1 (0) 1 m:  1 (0) 1 (0) 1 rov.
f 2 (dir del lav): 1 dir (0) 1 (0) 1, [1 rov,1dir] rip fino alla fine del ferro.
f 3: come il ferro  1. Cambiare con i ferri  4.0mm .
f 4:  4rov (6) 4 (6) 3 , [9 dir,3 rov ] rip per 3 (3) 4 (4) 5 volte,9 dir,2 rov (3) 2 (3) 1.
f 5: lav le m come si presentano.
f 6: 4 rov (6) 4 (6) 3,  [C4B, 1 dir, C4F, 3 rov] rip per 3 (3) 4 (4) 5 volte, C4B, 1 dir, C4F, 2 rov (3) 2 (3) 1.
f 7: come il ferro 5.
Ripetere i ferri  4-7. per altre 7 (8) 9 (10) 11 volte.tagliare il filo e mettere le m in attesa.
MANICHE (farne 2)
Montare 27 (29) 33 (33) 35 m sui ferri  3.0mm .
f 1 (rov del lav): [1 rov,1dir] rip e finire il ferro con 1 rov
f 2 (dir del lav): [1 dir,1 rov] rip e finire con 1 dir.
f 3: come il ferro  1. Cambiare con i ferri 4.0mm .
f 4:  3rov (4) 0 (0) 1, 9 dir3 rov,9 dir,3 rov (4) 3 (3) 3, 0 dir (0) 9 (9) 9, 0 rov (0) 0 (0) 1.
f 5: lav le m come si presentano
f 6 (trteccia): 3 rov (4) 0 (0) 1, C4B, 1 dir, C4F, 3 rov, C4B, 1 dir, C4F, 3 rov (4) 3 (3) 3, [C4B, 1 dir, C4F]rip per 0 (0) 1 (1) 1 volta, 0 rov (0) 0 (0) 1.
f 7: come il ferro 5.
Rip i ferri  4-7 e allo stesso tempo iniziare ad aumentare 1mai lati del ferro ogni due ferri di treccia  fino ad avere  35 (37) 41 (45) 49 m,finendo al ferro 7.
tagliare il filo e mettere le m in attesa; lav un’altra manica allo stesso modo.
SPRONE
Al dir del lav di fronte a voi e con i ferri circolari lunghi da 4mm, lav le parti in questo modo:
  manica destra,dietro,manica sinistra,davanti= 174 (185) 210 (225) 246 m.
Continuare a lav in avanti e indietro con il ferro circolare.
Continuare con le trecce come descritto ai ferri  4-7, iniziando dal ferro  4:
f 1 (dir del lav): lav le m come si presentano.
f 2 (rov del lav) e tutti i ferri al rov del lav,lav le m come si presentano.
f 3 (treccia): continuare seguendo lo schema  e lav 3m ass al rov tra le maniche e il corpo ,ma non ai lati del ferro :6 m diminuite = 168 (179) 204 (219) 240 m rimaste sul ferro.
NOTA:quindi 2m in meno tra il davanti sinistro(quello più grande) e la manica sinistra , altre 2 tra la manica e il dietro, altre 2 tra il dietro e la seconda manica=6m in meno
 f 5: 5 rov (6) 2 (4) 6, lav 2m ass al rov,proseguire con lo schema e allo stesso tempo lav 3 m ass al rov tra il corpo e le maniche= 161 (172) 197 (212) 233 m rimaste sul ferro.
f 7 (treccia): come al ferro 3,salvo per la taglia  6-12 mesi :lav al rov 2m ass invece di 3 = 155 (166) 194 (206) 227 m rimaste sul ferro.
f 9: 4 rov (5) 1 (3) 5, lav due m ass al rov,terminare il ferro= 154 (165) 193 (205) 226 m rimaste sul ferro.
f 11 (treccia):come al ferro 3, ma non fare diminuzioni nella taglia 6-12 mesi = 148 (159) 193 (199) 220 m rimaste sul ferro.
f 13: continuare a lav e diminuire 3m tra le maniche e il corpo  ma solo per la taglia 3-6 mesi, e 1m per la taglia  12-18 mesi = 148 (150) 193 (196) 220 m rimaste sul ferro.
ora avremo 3m tra le trecce.
f 15 (treccia): proseguire diminuendo 1m tra le trecce (lav 2 ass al rov) ma non dim ai lati del ferro  = 137 (139) 178 (181) 203 m rimaste sul ferro.
f 17: lav come spiegato.
f 19 (treccia): lav come da modello.
f 21: 5 rov (6) 2 (4) 6, [3 dir,passare 1m,lav 2 ass al dir,accavallare la m passata sulle due lavorate ass(1 acc doppia)3 dir,2 rov] rip fino alle ultime  11 (12) 11 (12) 10 m,3 dir, 1 acc doppia,3 dir,2 rov (3) 2 (3) = 113 (115) 146 (149) 167 m rimaste sul ferro.
f 23 (treccia): 5 rov (6) 2 (4) 6, [C3B, 1 dir, C3F, 2 rov]rip fino alle ultime 9 (10) 9 (10) 8 m, C3B, 1 dir, C3F, 2 rov (3) 2 (3) 1.
f 25: lav come spiegato e allo stesso tempo lav 2 ass al rov tra le trecce ,ma non dim ai lati del ferro  = 102 (104) 131 (134) 150 m rimaste sul ferro.
f 27 (treccia): lav come spiegato.
SOLTANTO PER LE TAGLIE   0-3, 3-6 e 6-12 mesi, 
f 29: 5 rov (6) 2, [2 dir, 1 acc doppia,2 dir,1 rov] rip fino alle ultime  9 (10) 9 m,2 dir, 1 acc doppia, 2 dir,2 rov (3) 2 = 78 (80) 99 m rimaste sul ferro.
f 31 (treccia): 5 rov (6) 2, [C2B, 1 dir, C2F,1 rov] rip fino alle ultime  7 (8) 7 m, C2B, 1 dir, C2F, 2 rov (3) 2.
f 33: 5 rov (6) 2, [1 dir,1 acc doppia,1 dir,1 rov] rip fino alle ultime  7 (8) 7 m, 1 dir, 1 acc doppia,1 dir,2 rov (3) 2 = 54 (56) 67 m rimaste sul ferro.
Cambiare con i ferri  3.0 mm.
f 35: [1 dir,1 rov] rip fino alla fine del ferro e allo stesso tempo dim 1m al centro per la taglia  6-12 mesi soltanto = 54 (56) 66 m rimaste sul ferro.
f 36: [1 dir,1 rov] rip fino alla fine e al ferro succ chiudere le m.
SOLTANTO PER TAGLIE   12-18 e 18-24 mesi
f29: lav come spiegato.
f 31 (treccia): lav come spiegato.
f 33: 4 rov (6), [2 dir, 1 acc doppia,2 dir, 1 rov] rip fino alle ultime  10 (8) m:2 dir,1 acc doppia,2 dir,3 rov (1) = 102 (114) rimaste sul ferro.
f 35 (treccia): 4 rov (6),  [C2B, 1 dir, C2F,1 rov] rip fino alle ultime   8 (6) m, C2B,1 dir, C2F, 3 rov (1).
f 37: lav come spiegato.
f 39 (treccia): lav come spiegato.
f 41: 4 rov (6), [1 dir, 1 acc doppia,1 dir,1 rov] rip fino alle ultime   8 (6) m, 1 dir, 1 acc doppia,1 dir, 3 rov (1) = 70 (78) m.
f 42: come il ferro 2, cambiare con i ferri 3.0 mm
f 43: [1 dir,1 rov] rip fino alla fine del ferro.
f 44: come il ferro 43. chiudere le m.
FINITURE
Nascondere i fili.
Stirare leggermente al vapore.
Cucire la manica sinistra e il fianco , e il buchetto al sottobraccia.
cucire la manica destra.
Riprendere e lav al dir  53 (57) 61 (71) 75 dal bordo del davanti destro ,con i ferri 3mm e lav a coste 1/1 per  2 (2) 4 (4) 4 ferri.
Chiudere lavorando a coste.
fare lo stesso per l’atra parte.
Cucire 5 bottoni sul bordo a coste della manica e lato ds ,le asole non sono necessarie, i bottoni passeranno facilmente tra le maglie.
FINE..
MEASUREMENTS
Sizes
0-3 (3–6) 6–12 (12–18) 18–24 months
The chest circumference: 47 (50) 58 (61) 68 cm
The length of the sleeve: 12 (12) 12 (18) 21 cm
YARN
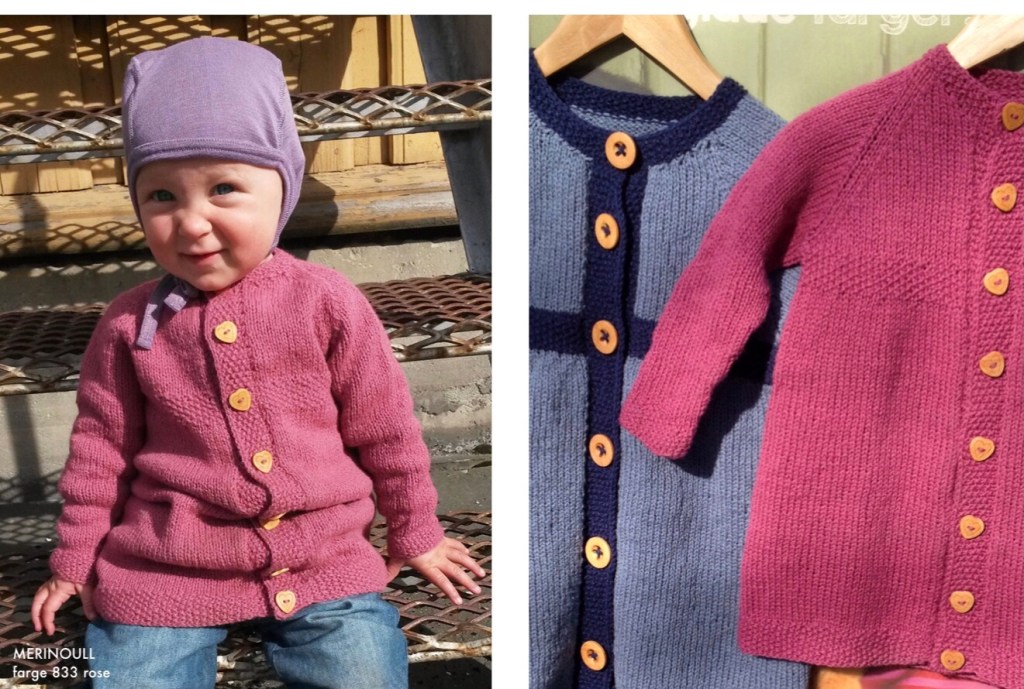
Baby Cashmerino from Debbie Bliss: 2 (2) 3 (3) 4 skeins à 50 g, colorway 340608, Dusty Rose
MATERIALS
Size 3.0mm and 4.0mm DPNs
A long(-ish) circlar needle in size 4.0mm
A cable needle
4 stitch holders
5 buttons (12mm in diameter)
Sewing needle and yarn
GAUGE
22 st and 28 rows on needles size 4.0mm = 10 x 10 cm
Cable over 9 stitches (C4B, k 1, C4F) equals 4.5 cm
ABBREVIATIONS
C2B – slip the next stitch on a cable needle and hold behind the work, knit the following stitch and then the stitch from the cable needle
C2F – slip the next stitch on a cable needle and hold in front of the work, knit the following stitch and then the stitch from the cable needle
C3B – slip the next 2 stitches on a cable needle and hold behind the work, knit the following stitch and then the 2 stitches from the cable needle
C3F – slip the next stitch on a cable needle and hold in front of the work, knit the following 2 stitches and then the stitch from the cable needle
C4B – slip the next 3 stitches on a cable needle and hold behind the work, knit the following stitch and then the 3 stitches from the cable needle
C4F – slip the next stitch on a cable needle and hold in front of the work, knit the following 3 stitches and then the stitch from the cable needle
BACK
Cast on 53 (57) 65 (69) 75 stitches on size 3.0mm needles.
Row 1 (WS): [p 1, k 1] until the last stitch, p 1.
Row 2 (RS): [k 1, p 1] until the last stitch, k 1.
Row 3: as row 1. Change to size 4.0mm needles.
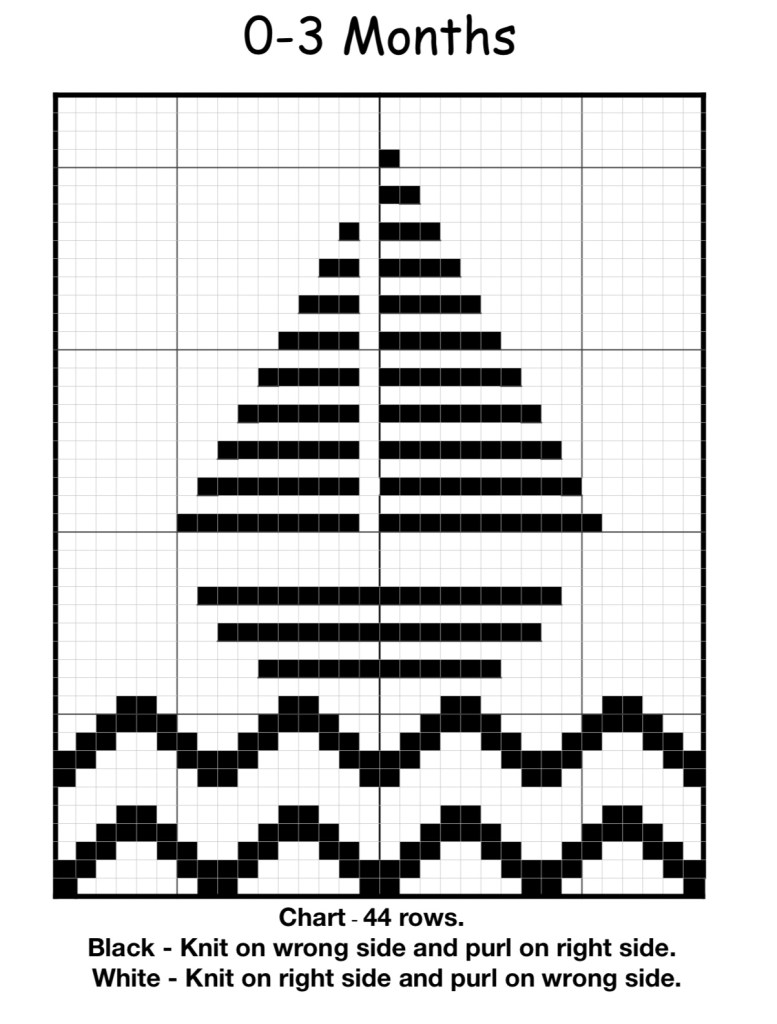
Row 4: p 4 (6) 4 (6) 3 sts, [k 9, p 3 ] 3 (3) 4 (4) 5 times, k 9, p 4 (6) 4 (6) 3.
Row 5: knit and purl as the stitches appear
Row 6: p 4 (6) 4 (6) 3,  [C4B, k 1, C4F, p 3] 3 (3) 4 (4) 5 times, C4B, k 1, C4F, p 4 (6) 4 (6) 3.
Row 7: As row 5.
Repeat rows 4-7. 7 (8) 9 (10) 11 more times. Cut the yarn and place the live stitches on a stitch holder.
FRONT
Cast on 51 (54) 63 (66) 73 stitches on size 3.0mm needles.
Row 1 (WS): [p 1, k 1] until the last stitch 1 (0) 1 (0) 1 stitch, p 1 (0) 1 (0) 1.
Row 2 (RS): k 1 (0) 1 (0) 1, [p 1, k 1] until the end of the row.
Row 3: as row 1. Change to size 4.0mm needles.
Row 4: p 4 (6) 4 (6) 3 sts, [k 9, p 3 ] 3 (3) 4 (4) 5 times, k 9, p 2 (3) 2 (3) 1.
Row 5: knit and purl as the stitches appear
Row 6: p 4 (6) 4 (6) 3,  [C4B, k 1, C4F, p 3] 3 (3) 4 (4) 5 times, C4B, k 1, C4F, p 2 (3) 2 (3) 1.
Row 7: As row 5.
Repeat rows 4-7. 7 (8) 9 (10) 11 more times. Cut the yarn and place the live stitches on a stitch holder.
SLEEVES (make 2)
Cast on 27 (29) 33 (33) 35 stitches on size 3.0mm needles.
Row 1 (WS): [p 1, k 1] until the last stitch, p 1.
Row 2 (RS): [k 1, p 1] until the last stitch, k 1.
Row 3: as row 1. Change to size 4.0mm needles.
Row 4: p 3 (4) 0 (0) 1, k 9, p 3, k 9, p 3 (4) 3 (3) 3, k 0 (0) 9 (9) 9, p 0 (0) 0 (0) 1.
Row 5: knit and purl as the stitches appear
Row 6 (cable row): p 3 (4) 0 (0) 1, C4B, k 1, C4F, p 3, C4B, k 1, C4F, p 3 (4) 3 (3) 3, [C4B, k 1, C4F] 0 (0) 1 (1) 1 times, p 0 (0) 0 (0) 1.
Row 7: As row 5.
Repeat rows 4-7 and at the same time start increasing 1 stitch at both ends of every other cable row until you have 35 (37) 41 (45) 49 stitches, ending with row 7. Cut the yarn and place the live stitches on a stitch holder. Knit the other sleeve similarly.
YOKE
With the right side of the work facing you and changing to the 4.0mm circular needle and work over the pieces in the following: right sleeve, back, left sleeve, front = 174 (185) 210 (225) 246 stitches. Continue to work back and forth on the circ. needles.
Continue with the cable pattern as described on rows 4-7, beginning with row 4:
Row 1 (RS): knit and purl the stitches as they appear.
Row 2 (WS) and all the following WS rows: knit and purl the stitches as they appear.
Row 3 (cable row): continue with the pattern and purl 3 stitches together between the sleeve and body parts, but not at the beginning or the end of the row. 6 stitches decreased, 168 (179) 204 (219) 240 stitches left.
Row 5: p 5 (6) 2 (4) 6, purl 2 sts together, continue in pattern and at the same time purl 3 stitches together between body and sleeves as before = 161 (172) 197 (212) 233 stitches left.
Row 7 (cable row): as row 3, except for size 6-12 mo. purl only 2 sts together instead of 3. 155 (166) 194 (206) 227 sts left.
Row 9: p 4 (5) 1 (3) 5, purl 2 stitches together, continue in pattern until the end of the row = 154 (165) 193 (205) 226 sts left.
Row 11 (cable row): as row 3, except no decreases for size 6-12 mo. = 148 (159) 193 (199) 220 sts left.
Row 13: continue in pattern and decrease 3 stitches between the sleeves and the body for size 3-6 mo. only, and 1 stitch for size 12-18 mo. only = 148 (150) 193 (196) 220 stitches left.
There are now 3 stitches between the cables.
Row 15 (cable row): knit in pattern and decrease one stitch between the cables (by purling 2 together) but not at the edge stitches at the beginning or the end of the row = 137 (139) 178 (181) 203 sts left.
Row 17: knit in pattern until the end of the row.
Row 19 (cable row): knit in pattern until the end of the row.
Row 21: p 5 (6) 2 (4) 6, [k 3, slip 1 st, k 2 sts together, pass the slipped stitch over (= s1k2tog psso), k 3, p 2] until the last 11 (12) 11 (12) 10 sts, k 3, s1k2tog psso, k 3, p2 (3) 2 (3) = 113 (115) 146 (149) 167 sts left.
Row 23 (cable row): P 5 (6) 2 (4) 6, [C3B, k 1, C3F, p 2] until the last 9 (10) 9 (10) 8 sts, C3B, k 1, C3F, p 2 (3) 2 (3) 1.
Row 25: knit in pattern until the end of the row and at the same time p 2 sts together between the cables but not at the edge stitches at the beginning and the end of the row = 102 (104) 131 (134) 150 sts left.
Row 27 (cable row): knit in pattern until the end of the row.
SIZES 0-3, 3-6 AND 6-12 MO. ONLY
Row 29: p 5 (6) 2, [k 2, s1k2tog psso, k 2, p 1] until the last 9 (10) 9 sts, k 2,  s1k2tog psso, k 2, p 2 (3) 2 = 78 (80) 99 sts left.
Row 31 (cable row): p 5 (6) 2, [C2B, k 1, C2F, p 1] until the last 7 (8) 7 sts, C2B, k 1, C2F,  p 2 (3) 2.
Row 33: p 5 (6) 2, [k 1, s1k2tog psso, k 1, p 1] until the last 7 (8) 7 sts, k 1, s1k2tog psso, k 1, p 2 (3) 2 = 54 (56) 67 sts left.
Change to needle size 3.0 mm.
Row 35: [k 1, p 1] until the end of the row and at the same time decrease one stitch in the middle for the size 6-12 months only = 54 (56) 66 left.
Row 36: [k 1, p 1] until the end of the row. Bind off all the stitches.
SIZES 12-18 and 18-24 MO. ONLY
Row 29: Knit in pattern until the end of the row.
Row 31 (cable row): Knit in pattern until the end of the row.
Row 33: p 4 (6), [k 2, s1k2tog psso, k 2, p 1] until the last 10 (8) sts, 2k 2, s1k2tog psso, k 2, p 3 (1) = 102 (114) sts left.
Row 35 (cable row): p 4 (6),  [C2B, k 1, C2F, p 1] until the last  8 (6) sts, C2B, k 1, C2F, p 3 (1).
Row 37: Knit in pattern until the end of the row.
Row 39 (cable row): Knit in pattern until the end of the row.
Row 41: p 4 (6), [k 1, s1k2tog psso, k 1, p 1] until the last  8 (6) sts, k 1, s1k2tog psso, k 1, p 3 (1) = 70 (78) sts left.
Row 42: As row 2. Change to needle size 3.0 mm
Row 43: [k 1, p 1] until the end of the row.
Row 44: As row 43. Bind off all the stitches.
PUTTING IT TOGETHER
Weave in all the yarn ends.
Block the piece lightly.
Sew the seam for left sleeve and side, also sew the little hole under the arm.
Sew the seam for right sleeve.
Pick up and knit 53 (57) 61 (71) 75 stitches along the right side of the cardigan’s right front with size 3.0mm needles.  Knit k1, p1 ribbing for 2 (2) 4 (4) 4 rows. Bind off. Do the same along the side of the back and the right sleeve.
Sew 5 buttons evenly across the ribbing along the back and the sleeve. Buttonholes are not needed, you can button straight through the  edge of the ribbing.

Read Full Post »

Come molte di voi forse sanno, ho dei gruppi su Facebook come appendice di questo blog: uno si chiama “La Maglia Di Marica top Down “,ed è dedicato alla tecnica di lavorazione dall’alto, un altro “La Maglia Di Marica plus “,ed è dedicato a tutte le altre tecniche e uno che si chiama “La Maglia Di Marica i vostri modelli da quelli pubblicati nel blog.”,in cui chi si iscrive dovrebbe pubblicare le personali realizzazioni dei modelli che trovate qui.

Il più frequentato è quello dedicato al top Down , abbiamo appena superato le 20.000 iscritte !

Quello che ho pubblicato oggi è proprio di una delle tante iscritte al gruppo topdown:

Anna Maria Divisi ,che è anche una delle più attive nel gruppo.

Amministro il gruppo topdown e il gruppo plus assieme a Giancarla Coco,architetta,mamma e nonna,e piena di virtù!

Tra i suoi hobby non c’è solo la maglia ma realizza anche delle stupende torte a tema.

Il pullover che ho pubblicato oggi é stato realizzato in cotone e per una taglia 4 anni

Noi chiediamo alle iscritte di pubblicare i loro lavori corredati della spiegazione ,questo affinché il gruppo non sia solo una vetrina.

Eccovi quindi la spiegazione:

“Maglioncino realizzato da me guardando qui e la sul web ,ve lo racconto :

taglia quattro anni realizzato con cotone Muskat di DROPS e ferri 3 e 4 ,( aggiungo che dovrebbero bastare 5 gomitoli )

Con i ferri 3mm ho avviato 84 m. Lavorato per sei giri a maglia rasata per avere un collo rulottato (il giro d avvio in blu),poi continuato con i ferri 4mm ho distribuito 8 aumenti lungo il giro ( e il giro successivo ho messo i marcapunto 29+29 per il davanti e il dietro e 17+17 per le maniche ,

Gli aumenti si fanno sollevati ( o intercalari: con il ferro di sinistra si solleva il filo che unisce in basso i due ferri, prendendolo dal davanti e si lavora al dritto ritorto cioè sul dietro della maglia perché non venga il buco) e si fanno ogni due giri.

H o fatto 17 giri di aumenti ,le strisce sono di 4 giri per il colore panna e 2 per il blu ,finiti gli aumenti ho realizzato i pesciolini e poi fatto la divisione corpo maniche , mettendo in attesa le maniche,

Terminato il corpo a 24 cm dalla separazione e con i ferri 3 ho lavorato 8 giri a coste 2/2 ho chiuso lavorando a coste.

il raglan misura 16 cm .Per poter realizzare correttamente la ripetizione dei pesciolini che è su 14m per 16 volte ho diminuito prima della loro realizzazione 4 m.

Maniche

Lavorate in tondo ( o se volete con i ferri diritti aperte ) e lunghe 22 cm,

Diminuire una m ai lati del marcapunto o ai lati della manica,dopo la prima m e prima dell’ultima:a destra due assieme a sin un accavallata

Distribuite le diminuzioni lungo la manica fino a che resteranno 40 m

Terminare con i ferri più piccoli e 8 giri/ferri a coste 2/2.

Chiudere lavorando a coste.

Read Full Post »

https://images.phildar.fr/asset/public/modeles/043234/MOD_043234_5/MOD_043234_5

Read Full Post »

https://nostebarn.no/wp/wp-content/uploads/2020/09/perlekape-005109-0bfJQqtt.pdf

Modello originariamente in danese ,mi sono servita del traduttore automatico di Google che devo dire che é molto migliorato.

Fa ancora errori ma se avete qualche cognizione base di maglia potrete facilmente correggere

Taglie 1-2-4-6-8 anni

Ferri 3,5-4,5

Campione 20 m per 10 cm con ferri 4,5

Circ del busto 54 cm (58-64-68-72)

Lunghezza maniche 20cm(23-28-31-34)

Filato:150 grammi (200-250-300-350)

SPIEGAZIONE

SIlavora tutto assieme iniziando dal basso

Montare con i ferri 3,5 144 (156) 172 (180) 192 m e lav a p riso per 3 (3) 4 (4) 4 cm.

Cambiare con i ferri 4,5 e lav a m rasata fino a 27 (31) 34 (38) 42 cm. finendo con un F sul rov del lav.

F succ ( dir del lav) iniziare a lav a p riso Distribuire lungo il ferro delle diminuzioni portando le m a 108 (117) 129 (135) 144 m. Lav a p riso fino a 30 (34) 38 (42) 46 cm, e dim 0 (1) 1 (1) 0 m lungo il ferro : til 108 (116) 128 (136) 144 m sul ferro

Separazione

Ora metteremo in attesa separatamente le m dei davanti del dietro e dei sottomanica

Lav le prime 23 (25) 28 (30) 32 m, mettere in attesa le succ 8 m ,lav 46 (50) 56 (60) 64 m, mettere in attesa 8m,lav le ultime 23 (25) 28 (30) 32 m.

MANICA: Avviare 29 (31) 35 (37) 39 m con ifn ° 3,5 mm mettere un marker per l’inizio del giro sulla prima m e lavorare a p riso per  3 cm. Passare ai ferri  4,5 mm e aumentare 4 m in modo uniforme. Aumentare 1 m da ciascun lato della m con il marker ( sarà al centro sotto la manica )ogni 6 (6) 6 (8) 8 giri (= 2 aumenti per ogni giro ), per un totale di 8 (9) 10 (10) 11 volte (= 49 (53) 59 (61) 65 m). La manica misura 20 (23) 28 (31) 34 cm, intrecciare 8 m  con la m marcata al centro) e lasciare in attesa
Lav un'altra manica.

. Mettere le maniche sullo stesso ferro ai lati del corpo mettere un marker tra davanti manica,manica dietro,dietro manica,manica davanti e lavorare avanti e indietro su tutte le m (= 174 (190) 214 (226) 242 m). Intrecciare ora per il raglan ogni due ferri una m ai lati di due m dal marker (8 m diminuite): due m prima del marker 2 ass ritorte dopo due m dal marker 2 ass al dir.
F succ rov
Rip questi due ferri per 11 (12) 14 (15) 17 volte. Intrecciare 3 (3) 4 (4) 4 m da ciascun lato del ferro per lo scollo. Continuare a diminuire per il raglan a ferri alterni come prima, e allo stesso tempo diminuire 2 m all'inizio di ogni f fino a quando tutte le m sul davanti sono state intrecciate. Tagliare il filo e lasciare in attesa il collo

PER BORDO DEI BOTTONI al dir del lav Riprendere 2 m ogni 3 ferri lungo tutto il davanti sinistro con i ferri n ° 3,5 mm, quindi lavorare un ferro a maglia rasata e proseguire a p riso per 3 cm,chiudere lavorando a p riso
BORDO DELLE ASOLE
Fare lo stesso sul davanti destro, ma inserire 6 (6) 6 (7) 7 asole distribuite uniformemente dopo 1 cm. Dovrebbe esserci anche un'asola nella scollatura, quindi posiziona l’asola superiore leggermente sotto il bordo dello scollo
BORDO DEL COLLO
Al dir del lav riprendere le m attorno al girocollo,fare un F dir poi a p riso e dopo un cm fare un’asola a ds
A 3 cm chiudere le m.

FINITURE

Cucire le 8 m ai sottomanica a p maglia

Stirare leggermente al vapore cucire i bottoni

Read Full Post »

Anche in cotone per le sere estive o la montagna

Link all’ originale https://www.stoffstil.pt/odettes-summer-sweater

Se lo realizzate con un filato più grosso e qui di ferri più grossi,seguite una taglia o due più piccole adeguando le lunghezze

TAGLIE
92 (104) 110 (122) 128 cm di altezza

Corrispondono a:( misure prese dal sito di DropsGarnstudio)

3/4 – 5/6 – 7/8 – 9/10 – 11/12 – 13/14 anni
Taglie corrispondenti ad un’altezza del bambino in cm:
98/104 – 110/116 – 122/128 – 134/140 – 146/152 – 158/164


MISURE
Larghezza del busto cm: 29 (30) 31 (33) 34 LUNGHEZZA : 35 (39) 41 (44) 47ccm
FILATO
Woolly Fraya 100% Alpaca 50 g = 150 m
Quantità di filato
150 (200) 200 (200) 250 g
CAMPIONE
26 m e 36 ferri = 10 x 10 cm a m rasata con ferri (3,0 mm)
FERRI
2,5 and 3,0 mm lunghi 60 cm ,e a d punte
3 markers


OPZIONALE
Versione a maniche corte lavorando 5 giri a coste 1/1 con i ferri 2,5 dopo avere separato le maniche.Chiudere lavorando a coste.

SPIEGAZIONE.

Si inizia a lavorare dal collo

Con i ferri 2,5 a d punte montare 80 (84) 84 (88) 88 m piazzare un marker per l’inizio del giro

Lav 6 giri a coste 1/1 e allo stesso tempo mettere un marker dopo 24 (26) 28 (30) 32 m per il dietro e dopo 16 (16) 14 (14) 12 m per la manica , 24 (26) 28 (30) 32 m per il davanti , 16 (16) 14 (14) 12 m rimaste per l’altra manica .
Passare ai ferri 3mm
G 1: 3 dir,2 ass,1gett,1dir,1gett,2ass al dir rit,3 dir,1 gett,dir fino a 11 m prima del marker,1 gett,3 dir,2ass,1gett,1dir,1gett,2ass rit,3 dir .marker,2 dir,1 gett,dir fino a 2 m prima del marker,1gett,2dir,marker,* Rip un’altra volta

G 2 dir

G 3:2 dir,2 ass,1 gett,3 dir,1 gett,2 ass al dir ritorto,2 dir,1 gett,dir fino a 11 m prima del marker,gett,2 dir,2 ass,1 gett,3 dir,1 gett,2 ass al dir rit,2 dir,marker,2 dir,1 gett,dir fino a 2 m prima del marker,1 gett,2 dir,marker,* Rip un’altra volta

Davanti e dietro : 28 (30) 32 (34) 36 m, maniche: 20 (20) 18 (18) 16 m.
G 4: Dir

Rip i giri 1-4 per altre 12 (12) 13 (13) 14 volte

Avremo : 76 (78) 84 (86) 90 m per davanti-dietro e 68 (68) 70 (70) 70 m per le maniche.
Separiamo le maniche e le mettiamo in attesa per lavorarle più tardi,mettiamo sullo stesso F circolare il davanti e il dietro

Proseguire lavorando lo schema e allo stesso tempo montare 4 m tra il davanti e il dietro e mettere un marker al centro delle 4 m ..

Avremo 80 (82) 88 (90) 94 m per davanti/dietro

Proseguire lavorando su queste m in tondo e fare un aum ai lati del marker ogni 12 giri ( al quarto giro dello schema) in questo modo:

*11dir,1aum,dir fino a 11 m prima del marker ,1aum,11dir,marker,* Rip un’altra volta
Cont in questo modo fino a 34 (38) 40 (43) 46 cm .
Passare ai ferri circ 2,5 mm e lav 5 giri a coste 1/1

Chiudere morbidamente lavorando a coste .
MANICHE LUNGHE
Dal sottomanica riprendere e lav al dir 2 m con un F a d punte 3mm, lav le 68 (68) 70 (70) 70 m in attesa,Rip 2 m,mettere un marker al centro delle nuove m sotto la manica

Cont a m rasata diminuendo una m ai lati marker ogni 6 (6) 7 (7) 7 giri

Cont a lav fino a 23 (26) 27 (30) 32 cm dal sottomanica,poi con i ferri 2,5 lav a coste 1/1 per 5 gir

Chiudere morbidamente lavorando a coste. Fare l’altra manica allo stesso modo.
Finiture

Nascondere i fili

Originale

YOKE:
On the 13-12 (2,5 mm) double pointed needles cast on 80 (84) 84 (88) 88 sts. Place a mrk at the beg of the round. Work 6 rounds of rib, k1, p1. At the same time place mrks after 24 (26) 28 (30) 32 sts back, 16 (16) 14 (14) 12 sts sleeve, 24 (26) 28 (30) 32 sts front, 16 (16) 14 (14) 12 sts left for the sleeve.
Switch to UK size 11 (3,0 mm) needles.
Round 1: K3, k2tog, yo, k1, yo, k2togtbl, k3, yo, k until 11 sts before the mrk, yo, k3, k2tog, yo, k1, yo, k2togtbl, k3, mrk, k2, yo, k until 2 sts before the mrk, yo, k2, mrk, rep from * to * one more time.

Round 2: K.
Round 3:K2, k2tog, yo, k3, yo, k2togtbl, k2, yo, k until 11 sts before the mrk, yo, k2, k2tog, yo, k3, yo, k2togtbl, k2, mrk, k2, yo, k until 2 sts before the mrk, yo, k2, mrk, rep from * to * one more time. Front and back : 28 (30) 32 (34) 36 sts, sleeves: 20 (20) 18 (18) 16 sts.
Round 4: K.
Round 1-4 creates the yoke where you inc 8 sts on every 2nd round. Repeat row 1-4 another 12 (12) 13 (13) 14 times. The st count is now: Front-back: 76 (78) 84 (86) 90 sts, sleeves: 68 (68) 70 (70) 70 sts.
Now divide the work. The sts for the sleeves are placed on a st holder and the sts for the front and back are placed on the same circular needles. Cont in patt according to chart 1 and at the same time cast on 4 sts between the front and back and place a mrk at the middle of the 4 sts on each side. Front-back: 80 (82) 88 (90) 94 sts. From here work the patt rep as before with 4 k sts on each side. On every 12th round make inc as follows (the 4th round of the patt): K11, 1 inc, k until 11 sts before the mrk, 1 inc, k11, mrk, rep from * to * one more time.
Cont in this way until the work measures 34 (38) 40 (43) 46 cm lengthwise.
Switch to 13-12 (2,5 mm) circular needles and work 5 rounds of rib, k1, p1. Cast off all sts loosely.
LONG SLEEVES:
Pick up 2 sts on UK size 11 (3,0 mm)double pointed needles, work the 68 (68) 70 (70) 70 sts from the st holder, pick up 2 sts. Place a mrk in the middle of the new sts, i.e. right under the sleeve. Cont in st st and dec 1 st on each side of the mrk on every 6 (6) 7 (7) 7th round as follows:
Mrk, k2, 1 dec, k until 4 sts before the mrk, 1 dec, k2.
Cont in this way until the work measures 23 (26) 27 (30) 32 cm from the armhole. Change to size 2,5 mm needles and work in rib, k1, p1 the next 5 rounds. Cast off all sts loosely.
Knit the other sleeve in the same way.
FINISHING:
Weave in all ends and block lightly.

Schema

Traduzione simboli

Dir sul dir e rov sul rov

Gettato

Due ass al dir

Due ass ritorte

Read Full Post »

Non é stupendo? E il disegno della barca si ottiene solo lavorando rov sul dir seguendo lo schema più in basso , schema che potrete utilizzare anche per taglie più grandi

Link all’originale https://www.ravelry.com/patterns/library/sail-away-baby-sweater

Taglie

0-3 mesi (3-6. 6-12)

Misure

Lunghezza 23cm(27-31)

Larghezza ai sottomanica 22cm(25-29)

Lunghezza maniche 15 cm(18-22,5)

Ferri 3,25-4

Campione 22 m e 30 ferri=10 cm con i ferri 4mm

Filato 210m, 260m, 340metri di filato da lav con ferri 4mm

Note
Si lavora dal basso

Gli aumenti sono intercalari ( o sollevati ) ma potete farli anche lavorando la m due volte:al dir e sul dietro

Gli aum si fanno a 2 m dai bordi

SPIEGAZIONE

**Con i ferri 3,25 montare 50m(54-62) e lav a coste 2/2 per 8(10-10) ferri

Dietro

Cambiare con i ferri 4mm

F d’impostazione:
10 dir,M1,30 dir(34-42),M1,K10 M1, 10dir (10,10). 52 (56, 64) m**

F succ rov

Cont a m rasata per 33, 41, 47 ferri.
Diminuzioni per lo scalfo.
Chiudere 3 m all’inizio dei succ 2 ferri. 46 (50, 58) m.
Cont a m rasata per altri 24 (30, 36) ferri .
F succ ( dir del lav ):chiudere 14 (16, 18) m e lav al dir le succ 18 (18, 22)m , metti in attesa 32 (34, 40) m lav al dir le ultime 14m(16-18) del bordo dei bottoni in questo modo2 dir,M1,(2dir(4-3) M1) Rip fino alle ultime 2m(2-1) e lav al dir:20m(20-24)

Bordo dei bottoni

Cambiare con i ferri 3,25

F1( rov del lav):3 rov,2 dir,2 rov fino all’ultima m,1 rov

F 2:3 dir,(2 rov,2 dir) Rip fino all’ultima m,1 rov

Ripetere questi due ferri altre due volte, poi chiudere lavorando a coste

DAVANTI .

Lavorare come fatto dietro da** a **
Iniziando con un ferro rovescio lavorare a maglia rasata per uno (3,3) ferri. Iniziare a lavorare lo schema.
10 dir (12, 16) lav il primo F dello schema,dir fino alla fine del ferro

F succ:10rov (12-16) lav il F 2 dello schema e finire il F al rov.
Lav fino a completare i 32 (38, 44) ferri dello schema

Scalfi

Chiudere 3 m all’inizio dei succ 2 ferri:. 46 (50, 58) m

Proseguire con lo schema

F succ:(dir del lav)18 dir(20-23), girare e lav solo su queste m per il dav sin

Dav sin scollo:

F 1:2 ass al rov,rov fino alla fine del ferro

F 2:dir fino alle ultime 2m,2ass al dir

F 3 rov

F 4 dir fino alle ultime 2 m,2 ass al dir

Ferri 5&6:Rip i ferri 3&4 :14m(16-19)


. Solo per le taglie 6-12 mesi.
Ferri 7 e 8) Rip i ferri 3 e 4. 18 m

Per tutte le misure:

Cont senza dim per 7 (9, 11) ferri .
Bordo delle asole

F succ:2dir,M1,(2 dir(4-3) M1) Rip fino alle ultime 2(2-1) m,e lavorare queste m al dir:20(20-24) m

.Cambiare con i ferri 3.25mm .
F 1) 3 rov(2 dir,2 rov) Rip e finire con 1 rov

F2:3 dir(2 dir,2 rov) Rip e finire con 1 dir

Solo per le taglie
0-3 e 3-6 mesi:

Orco dei bottoni

F 3) 3 rov,2 dir,1 gettato,2 ass al rov,2 dir,2 rov,1 gett,2 ass al rov,2 dir,3 rov.

So,o per la taglia 6-12 mesi:

F 3) 3 rov,2 dir,2 rov,2 ass al dir,1 gett,2 rov,2 dir,2 rov,2 ass al dir,1 gett,2rov,2dir,3rov.

Per tutte le misure:

F4:3 dir,(2 rov,2 dir) Rip e finire con 1 dir

Ferri 5&6: Rip i ferri 1&2

Chiudere lavorando a coste

Mettere in attesa le 10 (10, 12) m centrali e iniziare a lav alle restanti 18 (20, 23) m. Lavorare diritto fino alla fine del ferro.

Davanti destro-scollo.
F 1) 16 rov(18, 21) ,2 ass al rov.
F 2) 2 ass al dir,dir fino alla fine del ferro

F 3 rov

F4:2 ass al dir,dir fino alla fine del ferro

Ferri5&6: Rip i ferri 3&4:. 14 (16, 19) m

So,o per la taglia 6-12 mesi.
Ferri 7 e 8) Rip i ferri 3 e 4:18 m
Per tutte le misure:.
Cont senza dim per 8 (10, 12) ferri .
Chiudere le m o lasciarle in attesa per la chiusura con i tre ferri o a p maglia

Unire la spalla

Bordo del collo

Con i ferri più piccoli e al dir del lav riprendere per la taglia .
0-3 mesi
6 m dal bordo della banda delle asole,11 m dal lato destro dello scollo,lav al dir le 10 m in attesa del davanti,riprendere lav al dir 11 m dal lato sin dello scollo,lav le 18 m in attesa del dietro,e riprendere 6 m dal bordo della banda dei bottoni. 62 m.
3-6 mesi
Ripr e lav al dir 6 m dal bordo della banda delle asole,12 m dal lato sin del dav,lav al dirle 10 m in attesa del dav, ripr e lav al dir 12 m dal dav ds, dello scollo,lav le m in attesa del dietro in questo modo:,(6 dir,M1) per due volte,6 dir ,e riprendere 12 m dal lato ds dello scollo,e infine 6 m dal bordo della banda dei bottoni:66m.
6-12 mesi
Riprendere e lav al dir 6 m dal bordo della banda delle asole,14 m dal lato sin dello scollo,lav al dir le 12 m del davanti ,ripr 14 m dal dav ds, lav al dir le 22 m in attesa del dietro e infine ripr e lav al dir 6 m dal bordo della banda dei bottoni :74m

F 1:(2 rov,2 dir) Rip e finire con 2 rov

F 2 lav le m come si presentano

F 3:(2 rov,2 dir) Rip fino alle ultime 4 m:1 gett,2 ass al dir,2 rov

Ferri 4&5 Rip i ferri 2&1

Chiudere lavorando a coste
MANICHE

Con i ferri 3,25 montare 34m (34-38) e lav a coste 2/2 8ferri (10-10).

Cambiare con i ferri 4mm e proseguire a m rasata fino a 15.5cm (18.5cm, 23cm), dal F di montaggio aumentando 1 m ai lati del ferro all’interno di una m al quinto ferro e poi ogni 6(6-8) ferri fino ad avere 42(44-48) m

Chiudere le m

FINITURE

Cucire i fianchi

Sovrapporre il bordo delle asole,e a quello dei bottoni e cucirlo alla manica .
Inserire e cucire le maniche allineando la cucitura della manica con quella dei fienchi

Cucire i bottoni. .

Read Full Post »

Delizioso per le vostre piccole ragazze

Taglie 4-6-8-10-12 anni

Ferri 5

Campione 18,5 e 22 ferri 10×10 cm

Materiale 2-2-3-3-4 gom di cotone

P fantasia

Lav 16 F a m rasata

F 17 3 dir(7-11-5-8),*1 gett,2 ass,18 dir* Rip e finire con 1 gett,2 ass,2 dir (6-10-4-7)

F 18: lav le m come si presentano

Ferri 19-36 a m rasata

F 37:13 dir (17-21-15-18),*1 gett,2 ass,18 dir* Rip e finire con 1 gett,2 ass,12 dir (16-20-14-17)

F 38 lav le m come si presentano

DIETRO e DAVANTI sono uguali

Montare 75 m(83-91-99-105) e lav 6 ferri a legaccio poi a p fantasia su tutte le m ma lav a legaccio le prime e ultime 4m.

A 19 cm (22-25-28-31) cm aumentare ai lati per le maniche 7 m =89 m(97-105-113-119)

Proseguire a p fantasia ma lav sempre a legaccio lepri ed ultime 4 m

A 16 cm(17-18-19-20) cm dalle m montate delle maniche per le spalle chiudere ai lati all’inizio di ogni ferro:

a):2 v 5 m,4 v4m

b):5v5m,1v4m

c):2 v6m,4v5m

d):5v6m,1v5m

e):1 v7m,5v6 m

Scollo

A distanza di 21 cm (22-23-24-25) dall’inizio degli aum per le maniche chiudere le restanti 37 m(39-41-43-45) m

Cucire le spalle e i fianchi

https://www.katia.com/EN/tools/descarga-modelo/?revista=6071&numero=43&letra=

Read Full Post »

Moonlight di Katiahttps://www.katia.com/IT/tools/descarga-modelo/?revista=6071&numero=3&letra=

Taglie 2(4-6-8-10) anni

Un cardigan semplice ma carino per tutte le occasioni

Maniche raglan

Ferri 4mm

Campione 24 m e 29 ferri =10×10 cm a m rasata

Filato

DIETRO

Montare 80 m(86-92-100-108) e lav 4 ferri a coste 2/2 proseguire a m rasata diminuendo ai lati a due m dai bordi:

a):1 m ogni 8 ferri per 6 volte

b):1 m ogni 8 ferri per 7 volte

c): 1 m ogni 8 ferri per 8 volte

d):1 m ogni 8 ferri per 9 volte

e) 1 m alternativamente ogni 6/8 ferri per 11 volte

Restano:68 m(72-76-82-86) m

SCALFI

A 20 cm (23-26-29-32) cm dall’inizio chiudere all’inizio dei succ 2 ferri 1 volta 3 m(3-2-2-3-3) e proseguire diminuendo 1 m a 2 m dai bordi : a destra 2 ass e a sin un’accavallata

Per 17 volte(18-19-20-21)

A 12 cm(13-14-15-16) dall’inizio dello scalfo chiudere le 28m(32-34-36-38) rimaste

DAVANTI

Interno della tasca

Montare con i ferri 4mm 18 m(19-20-22-24) e lav a m rasata per 5 cm poi lasciare le m in attesa.

Montare 40m(43-46-50=54) con i ferri 3,5 e lav 4 ferri a coste 2/2 proseguire a m rasata con i ferri 4mm facendo a sin a 2 m dal bordo le stesse dim fatte dietro,a 7 cm dall’inizio fare un’asola al centro ( per la tasca:2 ass,1 gett)

A 8 cm dall’inizio ad un F sul dir del lav,per la tasca,lav 8 dir(8-9-8-8-) chiudere le succ 18m(19-20-22-24) lav al dir le rimanenti 8m(9-9-9-9).

F succ ( rov del lav): 8rov(9-9-9-9) ,rimettere sul ferro libero le m in attesa della tasca,lavorarle al rov lav al rov le restanti 8m(8-9-8-8).

34m(36-38-42-43).

Cont a lav a m rasata

SCALFO

A 20 cm(23-26-29-32) ad un F sul rov del lav chiudere per lo scalfo le prime 3m(2-2-3-3) poi dim 1 m a 2 m dal bordo ( alla fine del F succ sul dir del lav) ogni 2 ferri : 17 volte(18-19-20-21)

SCOLLO

Quando il davanti misura 29 cm (33-37-41-45) chiudere per lo scollo all’inizio del F sul dir del lav ogni due ferri :

a):1 volta 6m,1v3m,1v2m1b1m,1v2m

b):1v8m,1v3m,1v2m,1v1m,1v2m

c):1v9m,1v3m,1v2m,1v1m,1v2m

d):1v10m,1v3m,1v2m,1v1m,1v2m

e):1v11m,1v3m,1v2m,1v1m,1v2m

DAVANTI SINISTRO

Come il destro ma speculare

MANICHE

Con i ferri più grandi montare 44m (46-48-50-52) e lav 4 ferria coste 2/2

Proseguire a m rasata aumentando ai lati a 1 m dai bordi :

a): alternativamente ogni 22 e 24 ferri 1 m per due volte restano 48 m)

b):alt ogni 18e 20 ferri 1m per 3 volte ( 52m)

c):ogni 14 ferri 1 m per 5 volte ( 58m)

d):alt ogni 14 e 16 ferri 1 m per 6 volte(62m)

e):alt ogni 10 e 12 ferri 1 m per 8 volte (68m),.

SCALFI

A 24 cm(27-30-33-36) chiudere ai lati 3m (2-2-3-3) poi dim 1 m ( a destra a 2 m dal bordo 2 ass al dir e a sin un’acc)ed 17 volte( 18-19-20-21)

A 36cm(40-44-48-52) chiudere le 6(12-16-16-20) m restanti

FINITURE

Cucire i fianchi le maniche i raglan

BORDO DELLO SCOLLO

Con i ferri più piccoli al dirdel lav riprendere ( iniziando da destra ) 84m ( 92-10o-108-116) e lav 4 ferri a coste poi chiudere lavorando a coste

BORDO DAVANTI DESTRO

Al dir del lav ( iniziando dal basso) e con i ferri più piccoli Rip e lav al dir 90m (102-114-116-136) lav 2 ferri a coste2/2 e al terzo ferro fare le asole,la prima a 5 m dal bordo in alto e le altre a distanza di 15 m (18-20-22-25)

Lav un altro ferro e chiudere al F succ lavorando a coste.

Cucire i bottoni e l’interno della tasca cucire un bottone sul davanti per la tasca

Read Full Post »

Taglie 4-6-8-10-12 anni

Ferri 4 mm

Campione19 m e 32 ferri a p riso :10×10 cm

Filato cotone o merino :6-7-8-9-11 gom

DIETRO

Montare 74 m (80-86-72-78)

Lav a coste 2/2 per 1,5 cm

Proseguire a p riso fino a 31,5 cm (35,5-39,5-43,5-47,5) finendo con un F sul rov del lav

Chiudere ai lati :

a):1v6m,3v5m

b):3 v6m,1v5m

c):1v7m,3v6m

d):3v7m,1v6m

e):4v7m

Scollo

A 2,5 cm dall’inizio delle dim della spalla chiudere le restanti 32m(34-36-36-40)

DAVANTI DESTRO

Montare 39m(42-45-48-50) e lav a coste 2/2 e a 1,5 cm proseguire a p riso e allo stesso tempo fare le asole:

A 6cm (7-8-9-10) lav la prima asola a 3 m dal bordo destro e le succ a distanza tra loro di 5,5 cm(6,5-7,5-8,5-9,5)

Per fare un’asola : lav 3 m poi due ass,1 gettato

A 28cm(32-36-40-44) dall’inizio chiudere a destra per lo scollo: ad ogni F sul dir del lav:

a):1 v9m,1v3m,1v2m,4v1m

b):1 v10m,1v4m,1v2m,4v1m

c):1 v11 m,1v3m,1v2m,4v1m

d):1v12 m,1v3m,1v2m,4v1m

e):1 v13m,1v3m,1v2m,4v1m.

SPALLE

A 3,5 cm dall’inizio delle dim dello scollo chiudere a sin :

a):1 v6m,3v5m,

b):3v6m1 v5m,

c):1 v7m,3v6 m

e):4 v 7 m

d):3v7m,1v6m

DAVANTI SINISTRO

Lavorarlo allo stesso modo ma speculare

MANICHE

Montare 36 m(38-40-44-44) lav 1,5 cm a coste 2/2 e proseguire a m rasata aumentando ai lati :

a): 7 v 1 m ogni 8 ferri e ogni 10 ferri alternativamente

b):8 v 1m ogni 10 ferri

c):v1 m ogni ogni 10 ferri

d): 10 v 1 m ogni 10 ferri

e);10 v 1m ogni 10e 12 ferri alternativamente:50 m(50m(54-58-62-64 m)

Quando la manica misura 26cm(30-34-38-42m chiudere le m,

Farne un’altra uguale

BORDO DEL COLLO

Cucire le spalle e le maniche

Al dir del lav riprendere e lav al dir (82=86-92-96-102) m attorno allo scollo e lav a coste 2/2 e allo stesso tempo fare un’asola a destra al primo ferro,dopo le prime 3 m m.

Lav altri 4 ferri e chiudere

https://www.katia.com/EN/tools/descarga-modelo/?revista=5966&numero=13&letra=

Cucire le maniche i fianchi e i bottoni

Read Full Post »

Per spingere le più recalcitranti a tradurre dall’inglese, vi pubblico sia la traduzione che l’originale, di questo gilet con tasca

in modo che possiate confrontare e imparare così e tradurre; per tradurre un modello non è tanto indispensabile conoscere la lingua originale quanto saper lavorare a maglia, potete anche servirvi dei vari glossari che si trovano nel sito di Drops-GarnStudio.

Nascita (3-6-9-12-18 mesi, 2 anni)

Ferri 3,75

Campione 21 m e 44 ferri per 10 cm

Circ del busto del capo finito:43 cm ( 45-47,5-50-53-55-58)

Lunghezza: 20 cm (24-27-28-32-33-34)

 Filato ; 1[2, 2, 2, 3, 3, 3] gom da 65 grammi e137 metri :

Blue Sky Alpacas, Skinny Cotton [100% Organic cotton;  colore oliva 

Ferri circ 3,75mm corti (30-40 cm)

Marker di cui uno diverso per l’inizio del giro 

Abbreviazioni e tecniche 

M1: aumento intercalare o sollevato

Sollevare con il ferro di sinistra il filo che unisce in basso i due ferri prendendolo dal davanti e lavorarlo al dritto ritorto cioè sul dietro della maglia

pm piazzare un marker 

Sm: Spostare il marker

Spiegazione 

* Montare 13[14, 15, 16, 17, 18, 19] m, pm, montare 19[20, 21, 22, 23, 24, 25] m, pm: rip un’altra volta  e l’ultimo marker sarà quello dell’inizio del giro 

Lav in tondo facendo attenzione a che le m siano tutte allineate : 64[68, 72, 76, 80, 84, 88] m.

Punto riso 

G 1:1 dir,1 rov per tutto il giro 

G 2: * 1 dir, m1, lav a p riso fino al marker , m1, sm;  * rip per tutto il giro : 72[76, 80, 84, 88, 92, 96] m.

G 3: * 1 dir, riso fino al marker, sm;  * rip. 

Giri  4-11: Rip i giri 2 e 3, per 4 volte: 104[108, 112, 116, 120, 124, 128] m.

G  12: * 1 dir, m1, riso fino al marker succ, m1, sm, 1 dir, m1, dir fino al marker succ , m1, sm;  * rip un’altra volta:112[116, 120, 124, 128, 132, 136]  m.

G 13: * 1 dir,riso fino al marker succ,1 dir, sm, dir fino al marker succ, sm; * rip un’altra volta .

Rip i giri 12 e 13, altre 7[8, 9, 9, 11, 11, 12] volte : 168[180, 192, 196, 216, 220, 232] m.

Dovreste avere  39[42, 45, 46, 51, 52, 55] m per ogni manica   (Prima e terza sezione ) e 45[48, 51, 52, 57, 58, 61] m per dietro e davanti  (seconda e quarta sezione )

G di separazione delle maniche : Chiudere morbidamente le prime 39[42, 45, 46, 51, 52, 55] m  eliminare il marker quando chiudete l’ultima m , dir fino al marker succ , m1, eliminare il marker, chiudere le succ  39[42, 45, 46, 51, 52, 55] m , dir fino al prossimo marker, eliminarlo  : 90[96, 102, 104, 114, 116, 122]  m rimaste sul ferro per il corpo

Corpo

Solo per le taglie:3-9 e 18 mesi – g succ : M1, dir fino all’ultima m del davanti , m1, 2 ass al dir , unire il davanti al dietro , m1,dir fino all’ultima m del dietro , m1, 2 ass al dir , unire il dietro al davanti, mettere un marker di inizio giro .

per le altre taglie– g succ : dir fino all’ultima m del davanti , m1, 2 ass, unire davanti al dietro, dir fino all’ultima m del dietro, m1, 2 ass,unire dietro e davanti e mettere un maker di inizio del giro.

90[98, 102, 106, 114, 118, 122] m sul ferro .

Lav dir fino a 17 cm ( 17,5-20-22-23-24-25) dalla spalla 

Lav un g dir diminuendo 2 m in tutte le taglie in questo modo: 2 ass al dir all’inizio del giro, poi lav  43[47, 49, 51, 55, 57, 59] m, 2 ass al dir, e finire il giro : 88[96, 100, 104, 112, 116, 120] m.

Bordo 

Lav a”Waffle stitch “ :

G 1: riv.

G 2: dir.

Giri 3 e 4: (2 dir,2 rov ) per tutto il giro .

Rip i giri  1-4 per 7 cm (7-7-7-8-8-8) finendo con il g 3

Chiudere le m morbidamente 

Nascindere i fili 

Tasca 

Montare 20 m

F 1: dir

Ferri 2 e 3: (2 dir,2 rov) rip

Ferri 4 e 5:dir

Rip i ferri  2-5, per 5 volte.

Chiudere morbidamente 

Tagliare il filo lasciandolo lungo per la cucitura .

Finiture 

Fissare la tasca al centro dove preferite, con degli spilli e cucirla a p maglia.

Originale:

Newborn [3 months, 6 months, 9 months, 12 months, 18 months, 2T]

Owl softie 2½ x 3 inches 

Shown in size 6 months

Finished Measurements

Chest: 17 [18, 19, 20, 21, 22, 23] inches 

Length: 8 [9½, 10½, 11, 12¼, 12¾, 13¼] inches

Materials

Blue Sky Alpacas, Skinny Cotton [100% Organic cotton; 150yards / 137 meters per 2.25 ounce / 65 gram hank];

#313 Basil; 1[2, 2, 2, 3, 3, 3] hanks

Recommended needle sizes

US #5 (3.75 mm) 12 inch and 16 inch circular needles

Notions

Woodland Tee

Four stitch markers, one different for the start of round marker

Tapestry needle 

Scissors

Owl Pocket Friend

Wool felt scraps of various colors

Tapestry floss in coordinating colors

Tapestry needle

Scissors

Gauge

21 sts and 44 rnds = 4 inches in Seed st

Gauge is critical for this design.

Pattern Notes

Woodland tee is a raglan worked from the top down in the round with seed stitch and waffle stitch details. The pattern also includes a waffle stitch pocket sewn on with whipstitch or preferred method, and contains a hand sewn owl softie made from wool felt scraps.

Seed St: On first row, (k1, p1) around; on second row, (p1, k1) around. Repeat these 2 rows for pattern. After the first rnd, always knit the purl sts and purl the knit sts.

M1: Lift bar from row below with left needle from the front and place on left needle, knit into the back of the stitch with right needle

Sm: Slip marker

K2tog: Knit two stitch together, decreasing by one stitch

Skills Required

Seed Stitch, Waffle stitch and whipstitch

Instructions

* Cast on 13[14, 15, 16, 17, 18, 19] sts, pm, cast on 19[20, 21, 22, 23, 24, 25] sts, pm: repeat from * once more, making sure last marker placed is unique to mark end of rnd. Join to work in rnds, being careful not to twist sts: 64[68, 72, 76, 80, 84, 88] sts.

Rnd 1: * (K1,p1) to marker, sm; repeat from *around.

Rnd 2: * K1, m1, work in Seed st to marker, m1, sm; repeat from * around: 72[76, 80, 84, 88, 92, 96] sts.

Rnd 3: * K1, work in Seed st to marker, sm; repeat from * around. 

Rnds 4-11: Repeat Rnds 2 and 3, 4 times: 104[108, 112, 116, 120, 124, 128] sts.

Rnd 12: * K1, m1, work in Seed st to next marker, m1, sm, k1, m1, knit to next marker, m1, sm; repeat from * once more: 112[116, 120, 124, 128, 132, 136] sts.

Rnd 13: * K1, work in Seed st to next marker, sm, knit to next marker, sm; repeat from * once more.

Repeat Rnds 12 and 13, 7[8, 9, 9, 11, 11, 12] times more: 168[180, 192, 196, 216, 220, 232] sts.

You should have 39[42, 45, 46, 51, 52, 55] sts for each sleeve (first and third sections) and 45[48, 51, 52, 57, 58, 61] sts for back and front (second and fourth sections)

Sleeve Separation Rnd: Bind off first 39[42, 45, 46, 51, 52, 55] sts loosely, removing marker when binding off the last st, knit to next marker, m1, remove marker, bind off next 39[42, 45, 46, 51, 52, 55] sts loosely, knit to next marker, remove stitch marker 90[96, 102, 104, 114, 116, 122] sts

Detail

Body

For sizes 3 months, 9 months and 18 months Only – Next Rnd: M1, knit to last st of front, m1, k2tog, joining front and back sections, m1, knit to last st of back, m1, k2tog, joining back and front sections, place start of round marker.

For All Other Sizes – Next Rnd: Knit to last st of front, m1, k2tog, joining front and back sections, knit to last st of back, m1, k2tog, joining back and front sections, place start of round marker.

Your stitch count will be 90[98, 102, 106, 114, 118, 122] sts.

Knit around until piece measures 6½[7, 8, 8½, 9, 9½, 10] inches from the top of the shoulder.

Knit one rnd decreasing 2 sts for all size as follows: k2tog at the start of the rnd, then knit 43[47, 49, 51, 55, 57, 59] sts, k2tog, and knit to the end of the rnd: 88[96, 100, 104, 112, 116, 120] sts.

Detail

Lower Band

Work in Waffle stitch for approx.

Rnd 1: Purl around.

Rnd 2: Knit around.

Rnds 3 and 4: (K2, p2) around.

Repeat Rnds 1-4 for 2½[2½, 2½, 2½, 3¼, 3¼, 3¼] inches, ending with Rnd 3.

Bind off all sts loosely. Weave in ends.

Pocket

Cast on 20 sts.

Row 1: Knit across.

Rows 2 and 3: (K2, p2) across

Rows 4 and 5: Knit across.

Repeat Rows 2-5, 5 times.

Bind off all sts loosely. Cut yarn leaving long end for sewing.

Finishing

Pin pocket to center of Tee or preferred placement and, using long end, whipstitch or duplicate stitch

https://web.archive.org/web/20130610110219/http://www.petitepurls.com/2012/13/p_13_woodland.htmlInviato da iPhone

Read Full Post »

« Newer Posts - Older Posts »